ContentStudio API plan is now available. Create automations using Claude, Zapier, n8n, make, etc. Explore plan!
How to automate bulk social media posting & scheduling using CSV uploads?

When managing multiple social media accounts or creating a social media planner, manually scheduling each post can quickly become overwhelming. This is where the option of bulk social media posting and scheduling via CSV files becomes handy.
With ContentStudio’s powerful social media bulk scheduling feature, you can upload a CSV file to schedule and post multiple posts across different platforms in one go.
In this guide, we’ll walk you through the step-by-step process of using ContentStudio’s bulk social media scheduling feature through CSV imports, making your social media automation more efficient than ever.
Why do you need to automate bulk social media posting and scheduling?
Imagine cutting down hours of work into a few minutes, allowing you to focus on creating engaging content while the scheduling process runs in the background.
This feature saves time and ensures that your social media feed stays consistent, even when you’re busy with other aspects of your business.
- Consistency is key: Consistency is vital in keeping your audience engaged. With bulk scheduling, you ensure your social media feeds are continuously updated with new content, even when you’re on vacation or busy with day-to-day operations.
- Improve organization: Handling multiple posts across various platforms can get messy. Bulk scheduling helps you stay organized, giving you a clear overview of all your posts in one place.
- Streamlined workflow for teams: Bulk scheduling allows everyone to be on the same page if you’re working with a social media team. You can collaborate, plan, and schedule content all at once, avoiding miscommunication or overlapping posts.
Bulk scheduling through CSV files takes it a step further by offering ultimate convenience.
With ContentStudio, you can import a pre-organized CSV file containing all your posts, captions, images/videos, and scheduling times. This automated bulk social media posting and scheduling approach is perfect for large campaigns or when you’re managing multiple brands.
Just upload the file, and ContentStudio will take care of the rest—saving you hours of work while maintaining a seamless posting schedule.
How to bulk upload in ContentStudio?
First of all, sign in to your ContentStudio account and open Automation from the Compose section.
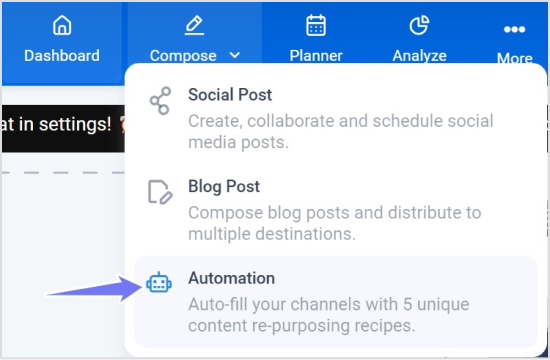
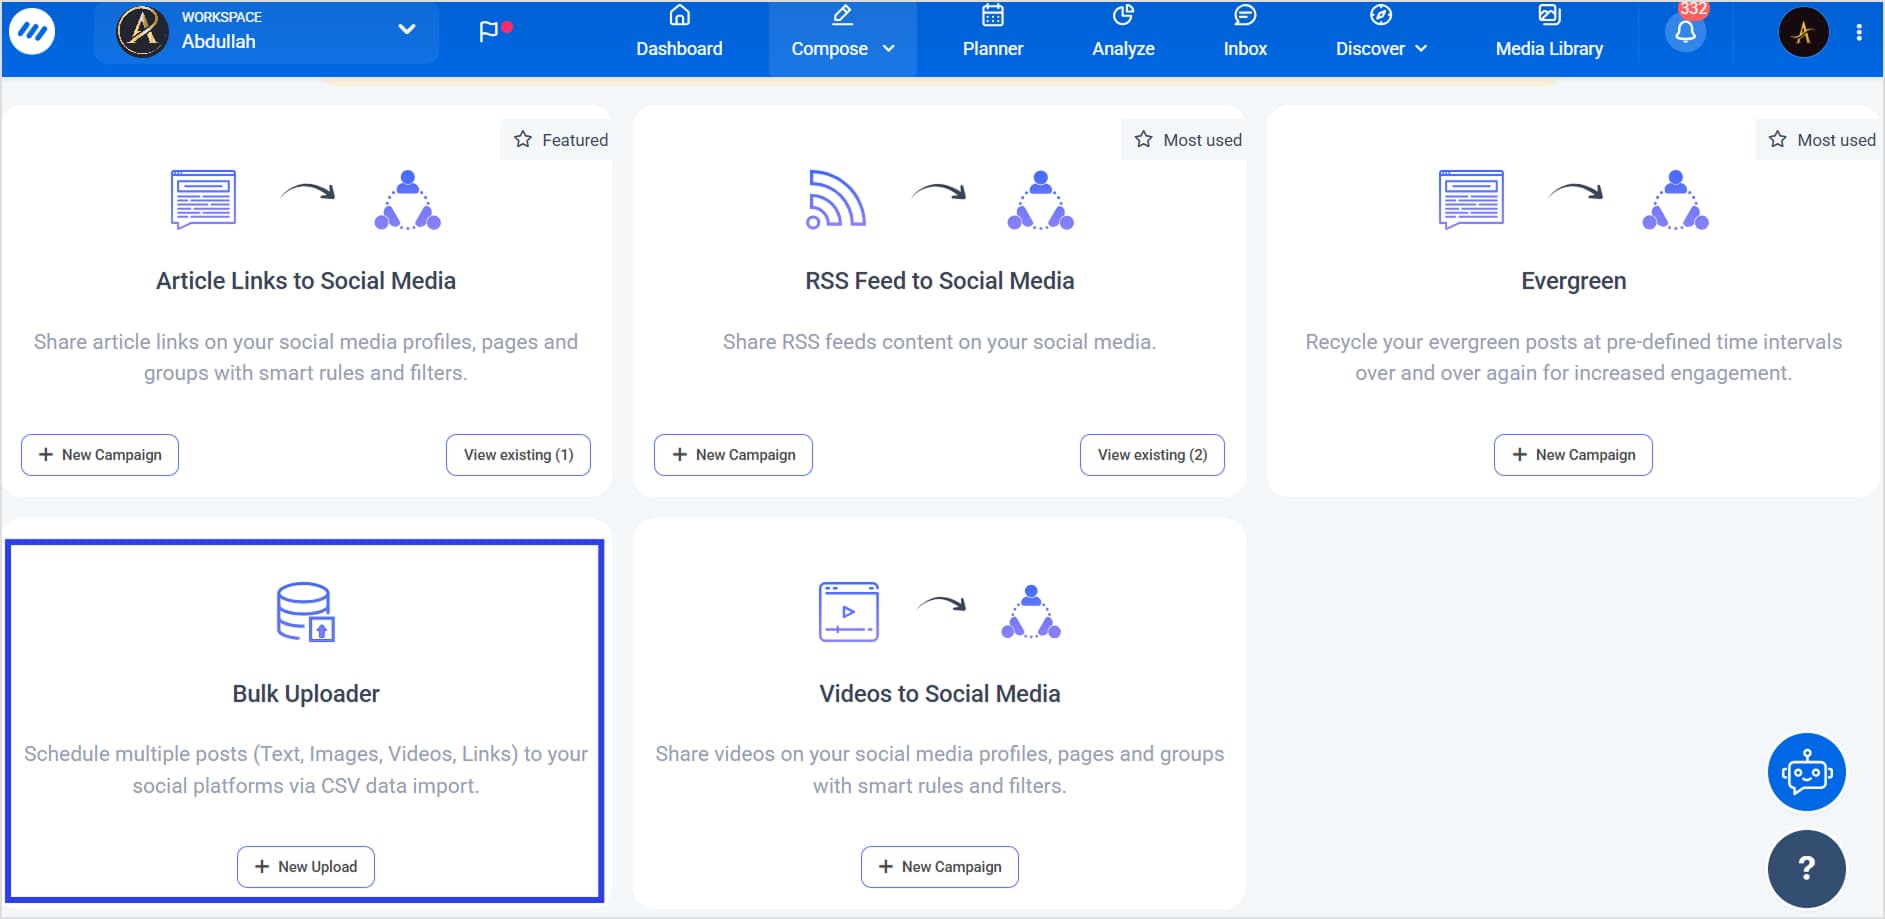
ContentStudio offers multiple bulk scheduling and posting options. Choose Bulk Uploader when you want to schedule social media posts via CSV.
Step 1: Create and upload your CSV file
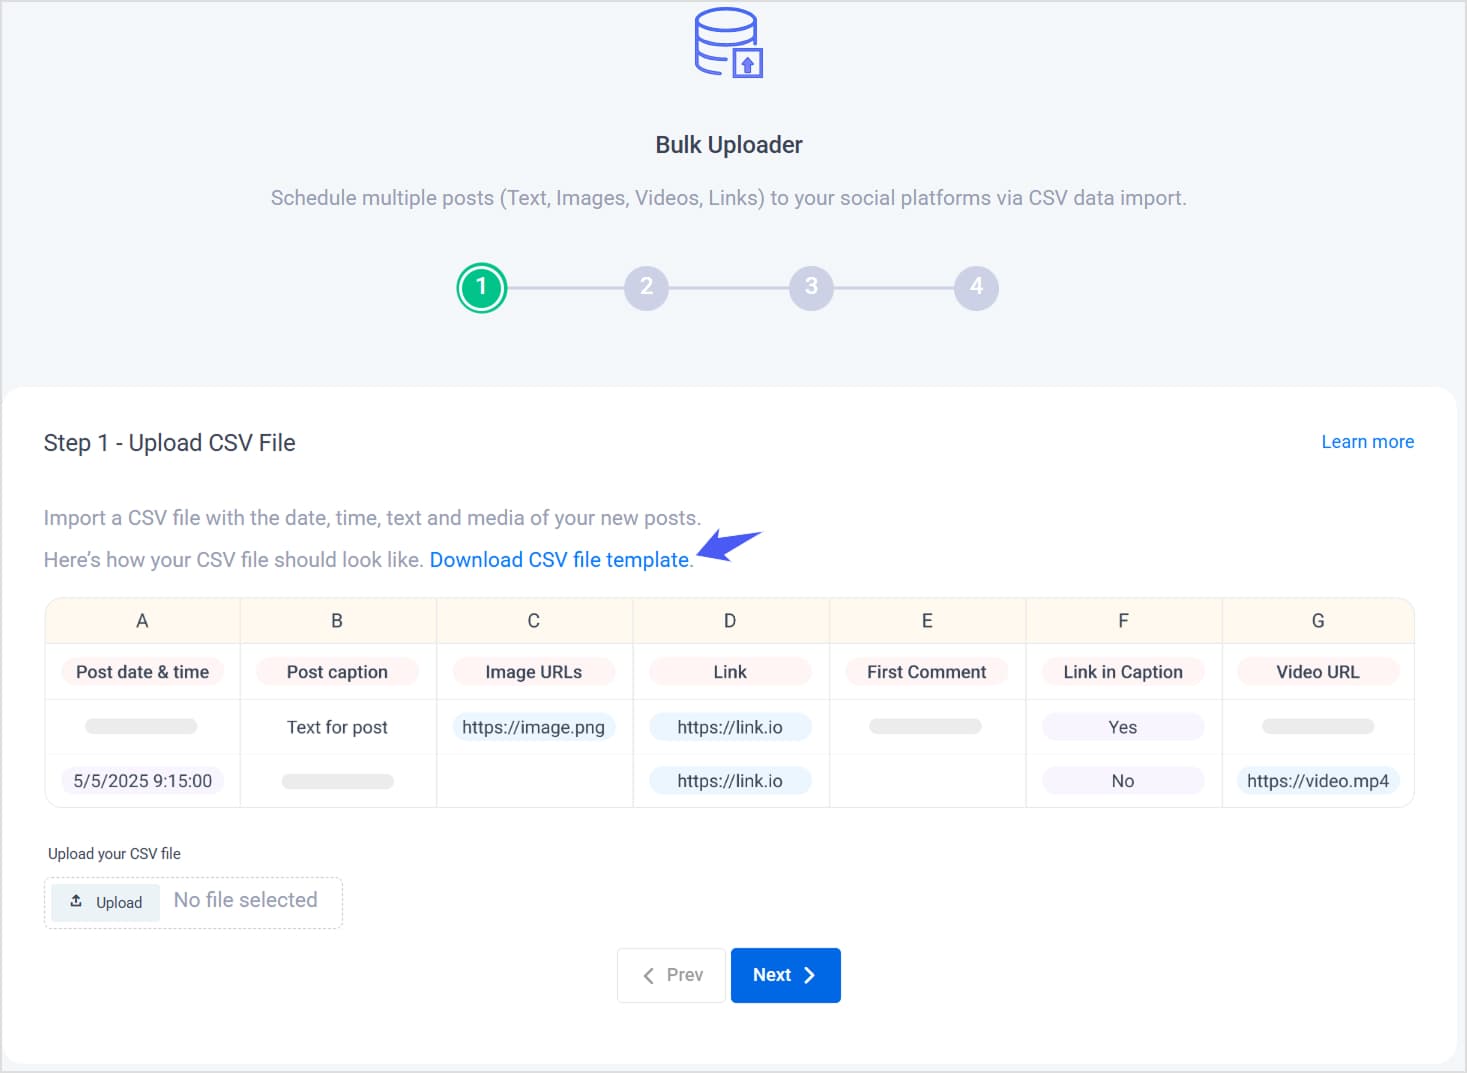
ContentStudio provides you with a CSV file template in which you can add content relevant to your social media posts. Download the CSV template file, so you can easily edit it with your own content.
How to create a CSV file for bulk scheduling in ContentStudio?
In this step, you have to upload a CSV file. You can download and edit the template CSV file, but your file must contain the following information in dedicated columns.
Column # 1: Post date and time
In this column, you must enter the date and time (in the format dd/mm/yyyy hh:mm or mm/dd/yyyy hh:mm) for the posts that you want to schedule. You must strictly follow the date and time format for it to be executed successfully.
Column # 2: Post caption
This column lets you add captions to your posts. You can customize messages for four different kinds of posts.
- Text-only posts: If you want to create a post in which you wish to add some text, you can do that by adding that text in this column.
- Text with image posts: If you want to create a post in which you want to add an image and some text along with it. You can add your custom text to this column and the image URL to the next column.
- Text with multiple images post: If your post includes several images, you can add your caption here to describe the images or provide context. The image URLs should be placed in the next column in separate lines.
- Text with video post: For posts that include a video along with a caption, enter your message in this column. The video URL should go into the appropriate column to complete the post setup.
- Text with link: If your post has a link and you want to add some message with it, enter your message here and the link in the fifth column.
- Text with a custom image on link preview: If you want to create a post in which you want to add a link, a custom image, and a message, enter your message/ caption in this post and the image URL and link in the next two fields, respectively.
- Text with a first comment: In this case, you can write your primary caption in this field and include a first comment (like additional details, hashtags, or mentions) in the dedicated comment column. This allows you to keep your post clean while still adding supplementary information in the first comment section.
Column # 3: Image URL
You can add images to your posts by adding the URLs of any public image in this field.
Column # 3: Link
Add links for articles, blogs, or any public content to your posts by entering the link URL in this column.
Column # 4: First Comment
If you want to add the first comments to your posts, you can add them in this column.
Column # 5: Include Link in caption
This column determines whether a link is included with the caption. By default, it’s set to “Yes.” Change it to “No” to exclude the link for a specific post.
Important
- Older CSV templates will default to “Yes” for this field.
- Only images will be uploaded when no video URLs are added.
- If both image and video URLs are provided, the video will be prioritized.
Column # 6: Video URL
Enter a video URL here to upload a video. If both image and video URLs are added, the video takes priority.
In the end, your CSV file should look something like this:

Note: ContentStudio offers multi-lingual support, allowing you to broaden the spectrum of your social media posts. The language support in the new version will be diversified by allowing you to choose any language in your bulk posts. Moreover, you can schedule up to 500 posts for your social channels via the bulk upload recipe.
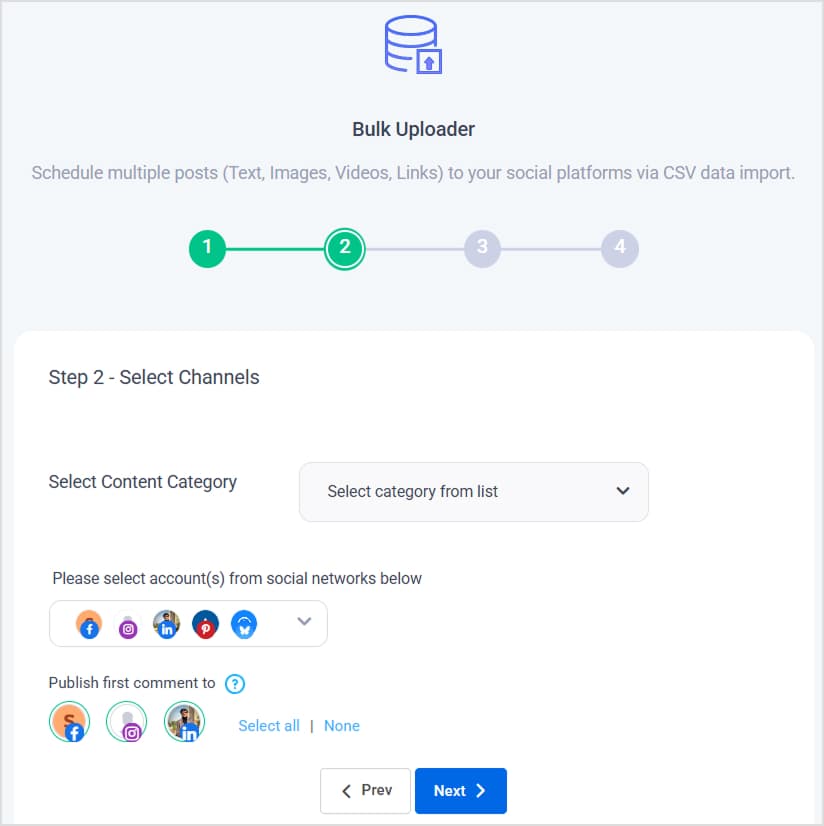
Step 2: Select social media channels
In this step, you must select the social channels for which you want to automate social media bulk posting via the CSV file. ContentStudio supports integration with all leading social media platforms, including Facebook, Instagram, Bluesky, TikTok, X (Twitter), and many others. Hence, you can easily bulk schedule and post content across multiple channels:
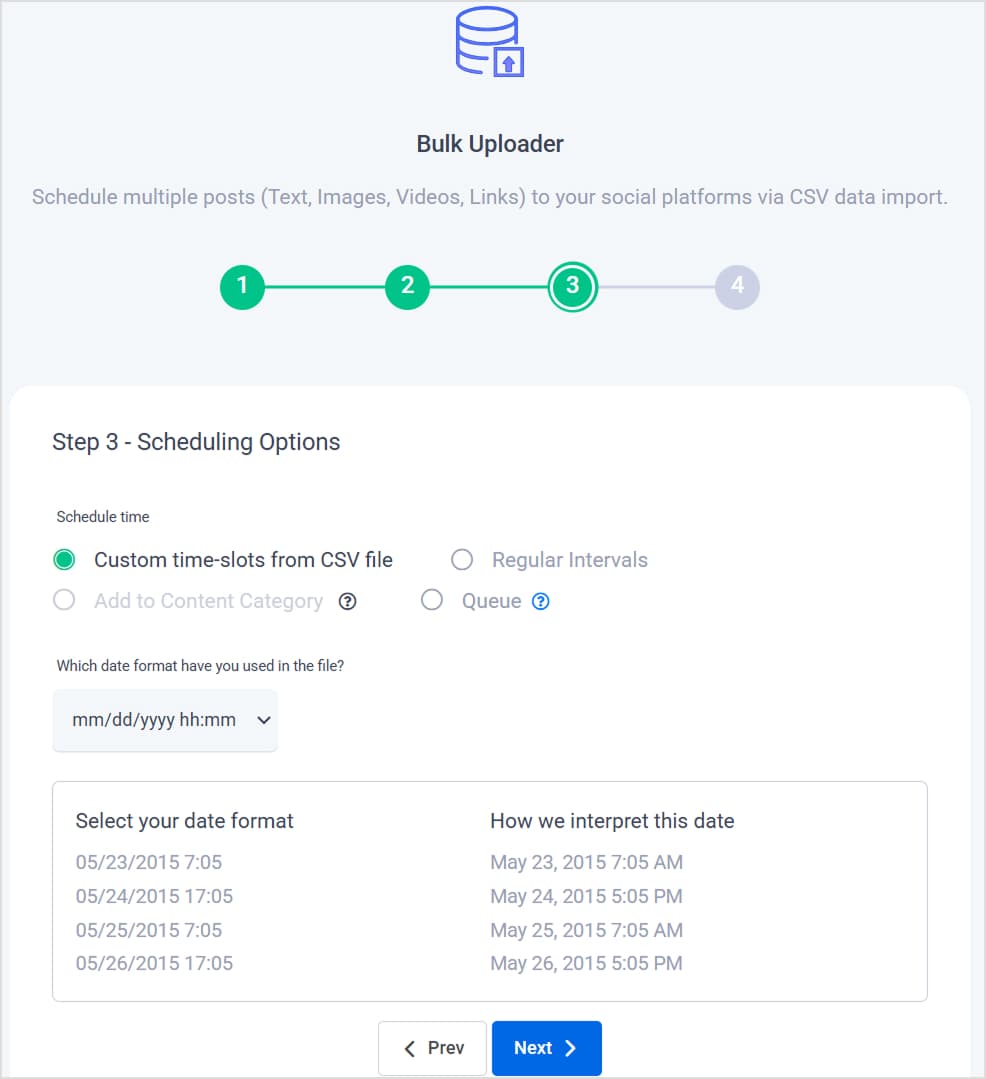
Step 3: Choose bulk scheduling options
In this step, you schedule your posts for your selected social channels. You have multiple scheduling options for your bulk posts, which are:
Custom time slots from CSV file
Here, you can allow the bulk uploader to use the date and time that you entered in the first column of your CSV file. You must choose the same format as you did in your CSV file. Your selected time format and how the system interprets it can be shown in the image below.
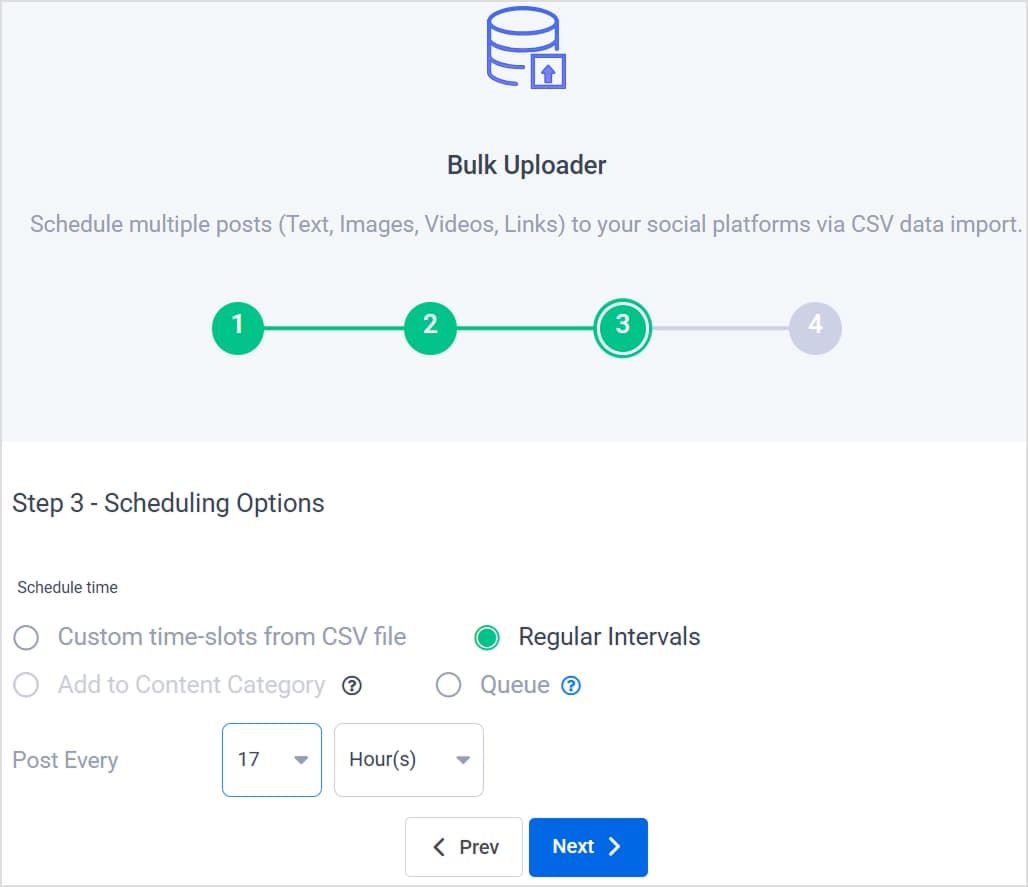
Regular intervals
If you choose this option, the date and time you entered in the CSV file will be ignored, and the posts in your file will be scheduled according to the recurring time you select. You can schedule your posts according to hours, days, or weeks.
For example, you could select this routine to post after every 17 hours, as shown in the image below.
Queue
Another option is to choose the queue scheduler. When you choose this option, the date and time you entered in the CSV file will be ignored, and the posts in your file will be scheduled according to the queue you have created for social posting.
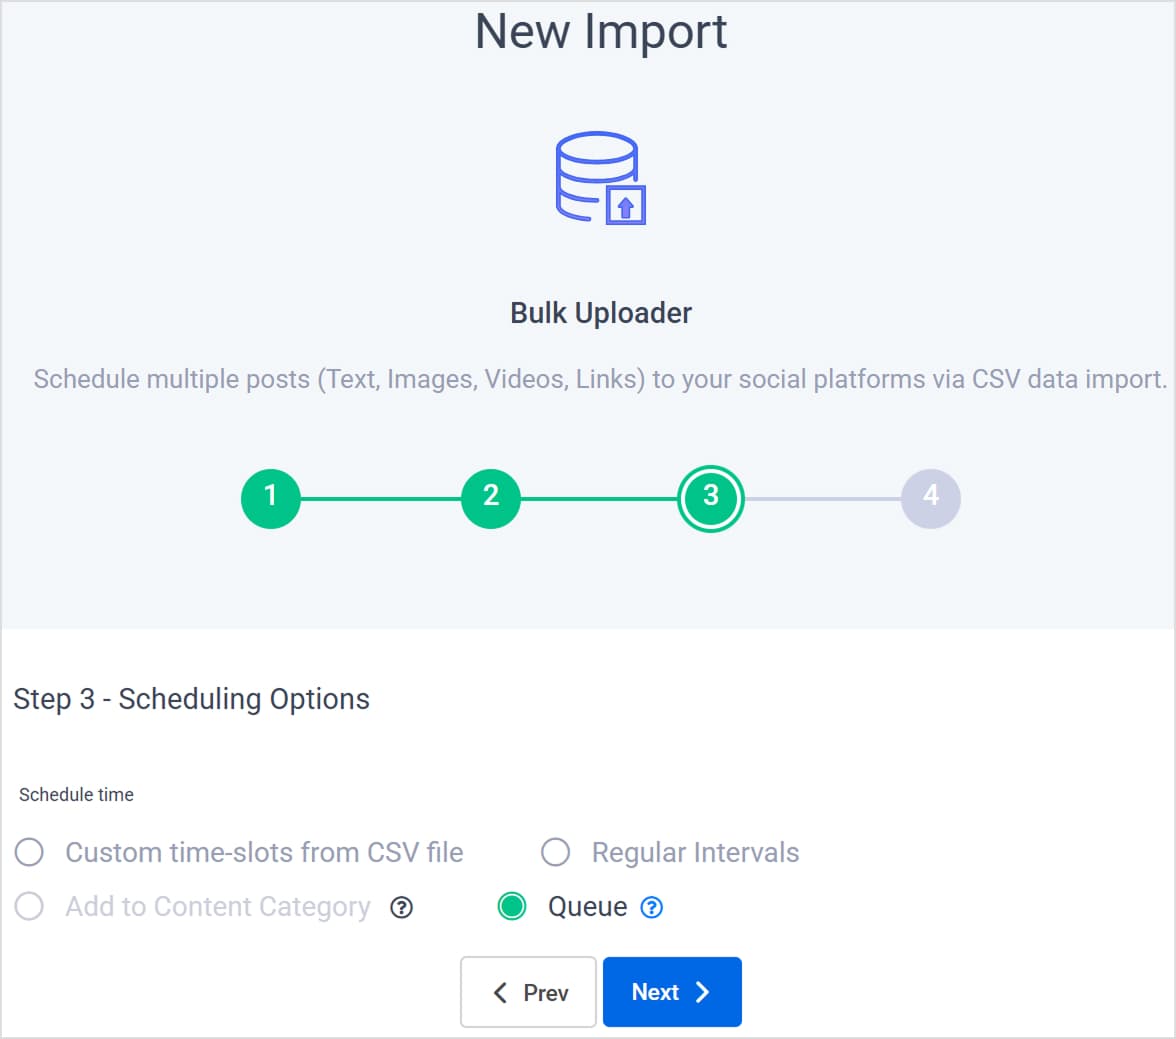
Alternatively, you can put the CSV content in the Content Category.
Related: How to create content categories
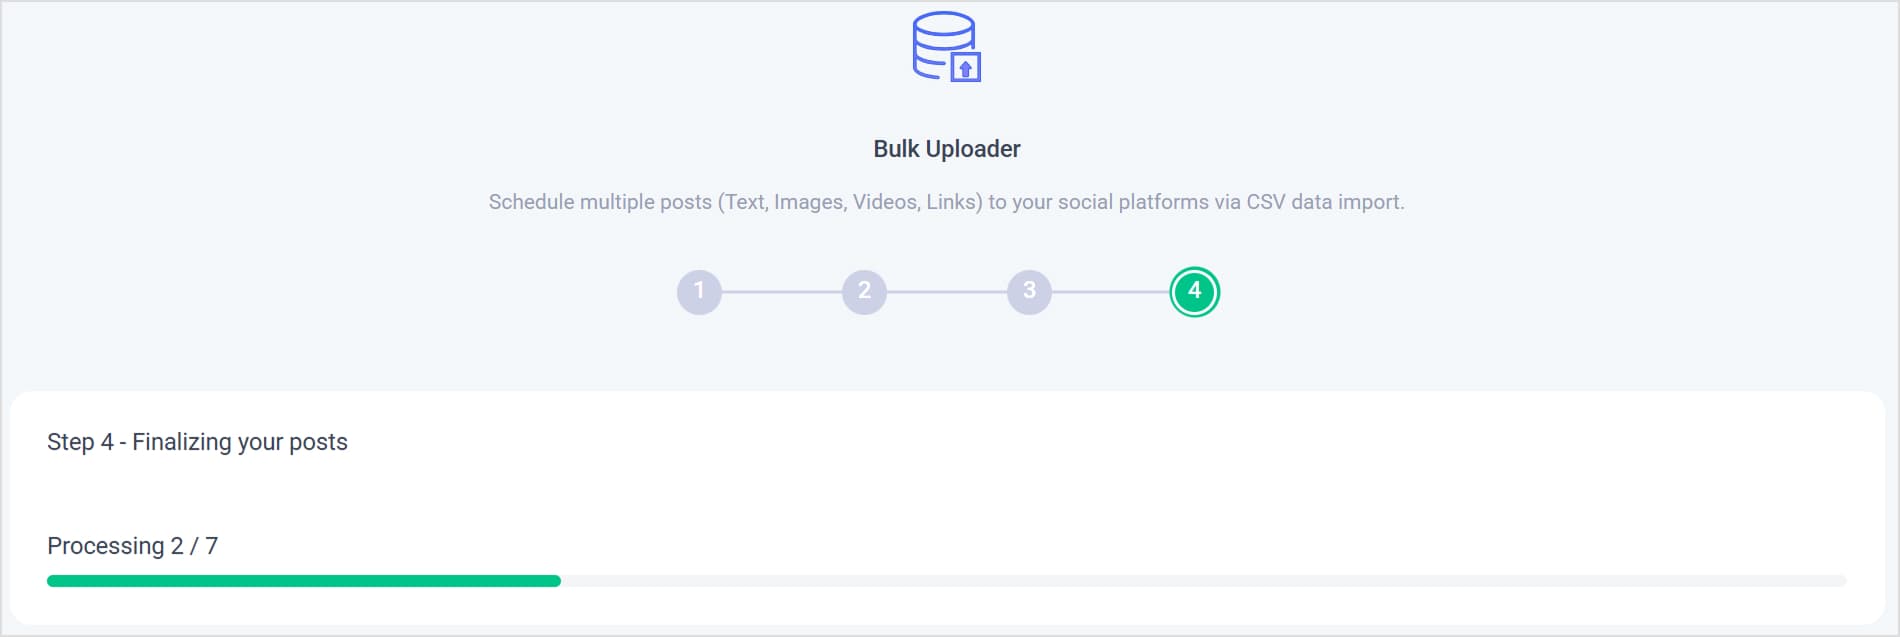
Step 3: Finalize your posts
Once you select the relevant scheduling option, click Next to allow ContentStudio to analyze and process the uploaded CSV file.
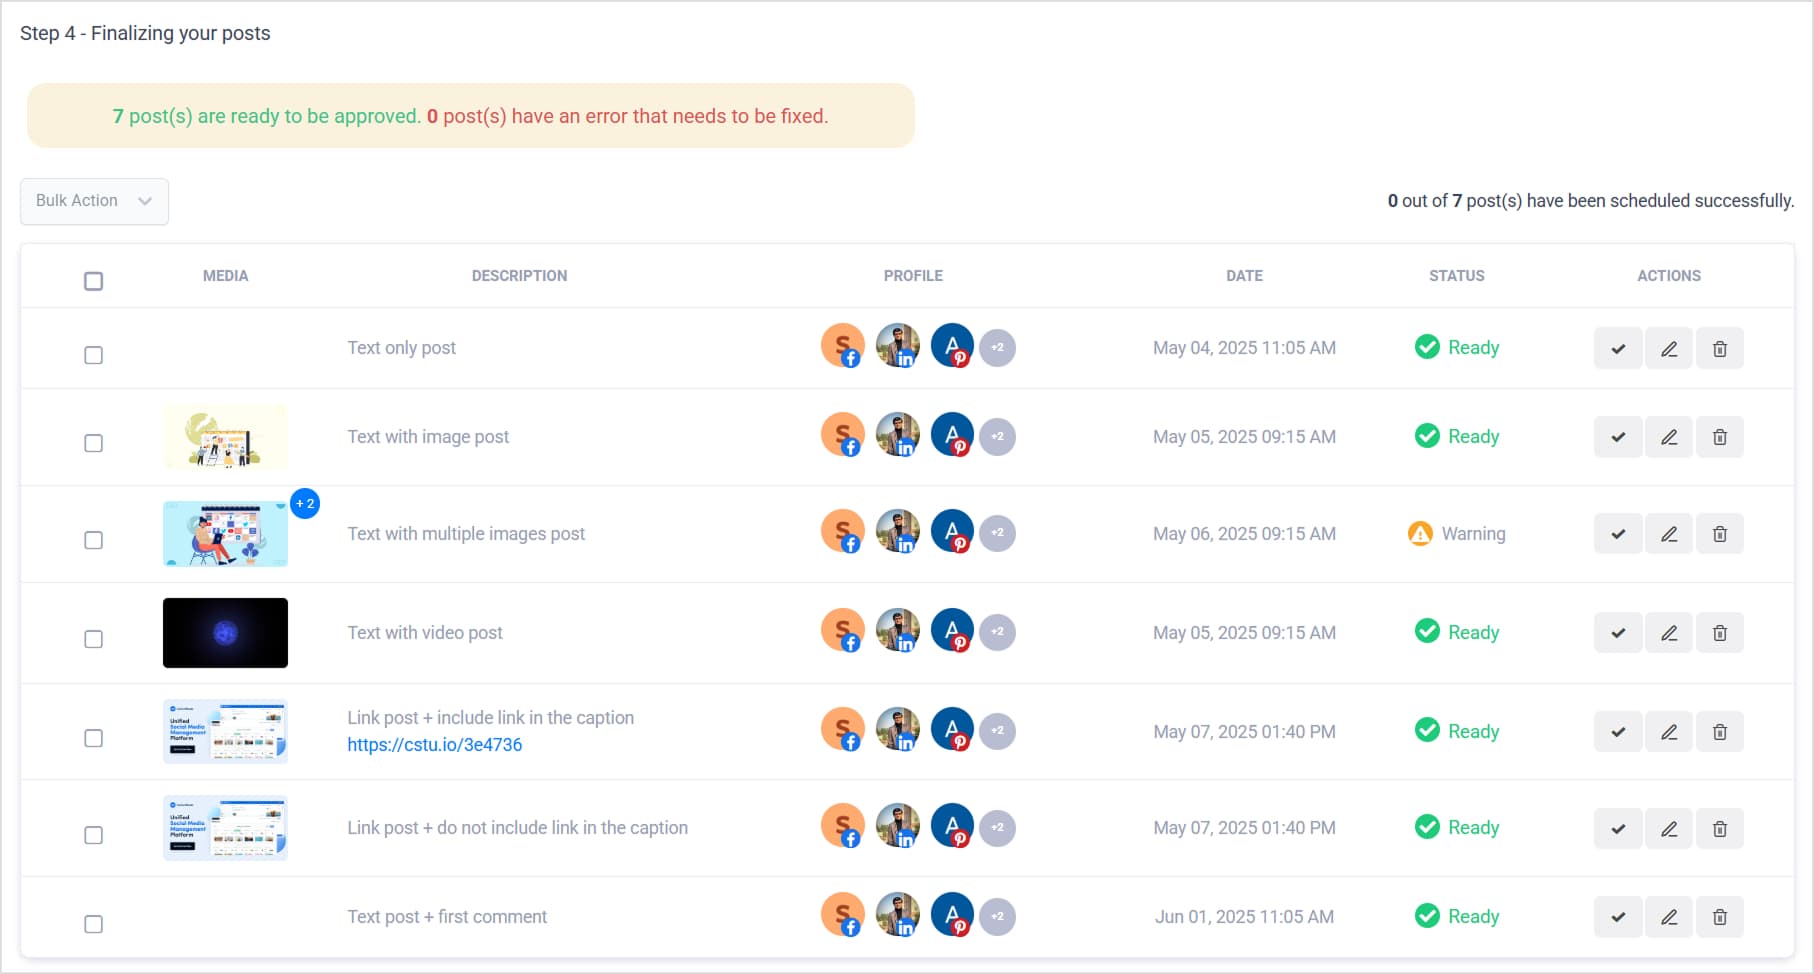
Once the processing is finished, a tabular list of all your scheduled posts appears. You can perform the following actions on your posts.
Edit an individual post.
In this step, you can edit a post by clicking on the pencil icon in front of it under the Actions heading.
Your post will appear in the editor, where you can change the text, add any link or image, change the time and date, change social channels, add labels, images, or tasks, etc.
Approve/delete posts in bulk or individually
You can select an individual post and approve or delete it by clicking the two buttons under Actions.
You could also select all the files and perform a bulk operation (approving or deleting in bulk). To do this, you select multiple files, select Bulk Action, and choose between Approve or Delete to perform the section.
All of the social media posts from the CSV file will now be added to the Planner and will be published at the selected times by ContentStudio.
Best practices for social media posting with CSV files in bulk
Organization and strategy are key to making the most of bulk scheduling and posting social media content. Here are some best practices to ensure your bulk scheduling process is smooth and effective:
Organize your CSV files for easy upload
A well-structured CSV file is crucial for error-free bulk scheduling. Make sure your CSV includes all necessary fields, such as post content, platform, posting time, and any associated media links. Use clear labels for each column and double-check your formatting before uploading to avoid missing data or errors during import.
Plan a balanced posting frequency
When bulk scheduling, it’s easy to over-saturate your audience with too many posts or leave gaps with no updates.
Plan a posting frequency that suits your audience’s engagement habits. Spread posts evenly throughout the day or week, ensuring your social media feed remains active without overwhelming followers.
Related Read: Social media engagement: 10 easy ways to improve it
Optimize posting times for maximum engagement
Different social media platforms have peak engagement times. Research and identify the best times to post on each platform and adjust your CSV’s schedule accordingly.
ContentStudio’s built-in analytics can help you pinpoint the optimal times based on your audience’s activity patterns, ensuring your posts reach more people when they are most active.
Diversify your content
Even though you’re scheduling in bulk, avoid repeating the same types of posts. Ensure your content mix includes a variety of formats—images, videos, links, and text. This keeps your social media feed dynamic and interesting for your followers, encouraging higher engagement.
Also Read: 15 game-changing practices for crafting relatable content in 2024
Review and edit before scheduling
Before you hit upload, review your entire content plan. Ensure your posts are error-free, links work, and visuals are appealing. Reviewing the CSV file before scheduling will prevent you from making post-publishing edits.
Test with a smaller batch first
If you’re new to bulk social media posting and scheduling, start by uploading a small batch of posts first. This helps you catch any potential errors in your CSV format and refine the process before you commit to scheduling weeks’ worth of content.
Conclusion
Bulk social media posting and scheduling via CSV is a game-changing feature that can save you time, streamline your social media strategy, and maintain consistency across your platforms.
By following best practices—such as organizing your CSV file, balancing post frequency, and optimizing posting times—you can maximize the benefits of this tool and ensure your content reaches your audience at the right time.
With ContentStudio’s user-friendly interface, bulk scheduling becomes seamless, allowing you to focus on what really matters—creating valuable content and engaging with your audience.
Start implementing bulk scheduling today and take your social media automation to the next level!
FAQs
What fields should be included in the CSV file for bulk scheduling?
To ensure a smooth bulk upload, your CSV file should include columns for the post content, posting date, time, social media platform, and any media links (if applicable).
How many posts can I bulk schedule at once with ContentStudio?
ContentStudio allows you to schedule up to 500 posts in a single bulk upload, making it perfect for planning long-term content strategies.
Can I edit posts after they’ve been bulk-scheduled?
Yes, you can easily make edits to scheduled posts through ContentStudio’s dashboard. Whether it’s tweaking captions, changing images, or adjusting posting times, you have full control over your content after scheduling.
What should I do if there’s an error during the CSV import?
If an error occurs, double-check your CSV file for formatting issues. Ensure that all fields are filled correctly and that the date and time formats are compatible with ContentStudio’s system.
How can I ensure my bulk-scheduled posts get maximum engagement?
Research the best posting times for each platform and schedule accordingly. Moreover, keep your content diverse, engaging, and tailored to your audience’s preferences to encourage higher interaction.
Recommended for you