LinkedIn Reach: What it means and how to reach the right people
Oct 23, 202616 minutes

Written by
Hassaan KhanUpdated
LinkedIn has over one billion members across more than 200 countries, yet most brands are still posting manually, relying on whoever happens to be online at the right time. That is not a content strategy. It is a bottleneck dressed up as a workflow.
Scheduling LinkedIn posts is the foundation of any serious LinkedIn marketing operation. It gives you control over when your content reaches your audience, creates space for review and approval before anything goes live, and frees your team from the daily pressure of posting in real time. If you want to get more from LinkedIn without adding more hours to your day, a dedicated LinkedIn scheduler is where that starts.
Whether you are posting from a personal profile or managing a company page, the process has more nuance than it first appears, from finding where LinkedIn actually stores your scheduled posts to understanding what each format requires before you hit schedule. This guide walks through all of it.
LinkedIn Marketing
Establish your brand’s profile on LinkedIn by consistently posting engaging content and engaging with the community.
Get Started for FREE
Posting on LinkedIn manually works until it does not. Showing up every day at 9 AM to write and publish a post is not a sustainable content operation, especially when you are also managing approvals, repurposing content across formats, monitoring comments, and tracking what actually performed.
What we know about how LinkedIn’s algorithm works consistently shows that regular publishing signals an active, credible presence. Scheduling lets you front-load the content work once a week and maintain a steady cadence without relying on daily willpower.
The best time to post on LinkedIn is typically Tuesday through Thursday between 9 AM and noon in your audience’s time zone. If you manage an account whose audience is in a different region, or if you work across multiple time zones, scheduling is the only way to reliably hit those windows.
Scheduling creates space for review. When a post is written on Monday for Thursday publication, there is time for a colleague, a client, or a legal reviewer to read it before it goes live. Manual posting rarely allows for that kind of deliberate process.
A post with the wrong figure, an outdated link, or a reference to an event that has been cancelled is easier to catch in a scheduled draft than in a live post you are trying to edit while it is already receiving comments.
The brands and individuals who build genuine presence on LinkedIn spend time in the comments, responding to questions and contributing to other people’s conversations. Scheduling the publishing work frees up that time. A strong content strategy treats scheduling as the logistics layer so the relationship work can happen on top of it.
LinkedIn’s built-in scheduler is available to all users at no cost. It works for personal profiles and company pages, on desktop and in the mobile app. The process on desktop is the most straightforward starting point.
That is the complete native desktop flow. The scheduled post will not appear in your feed or your audience’s feeds until the selected time passes.
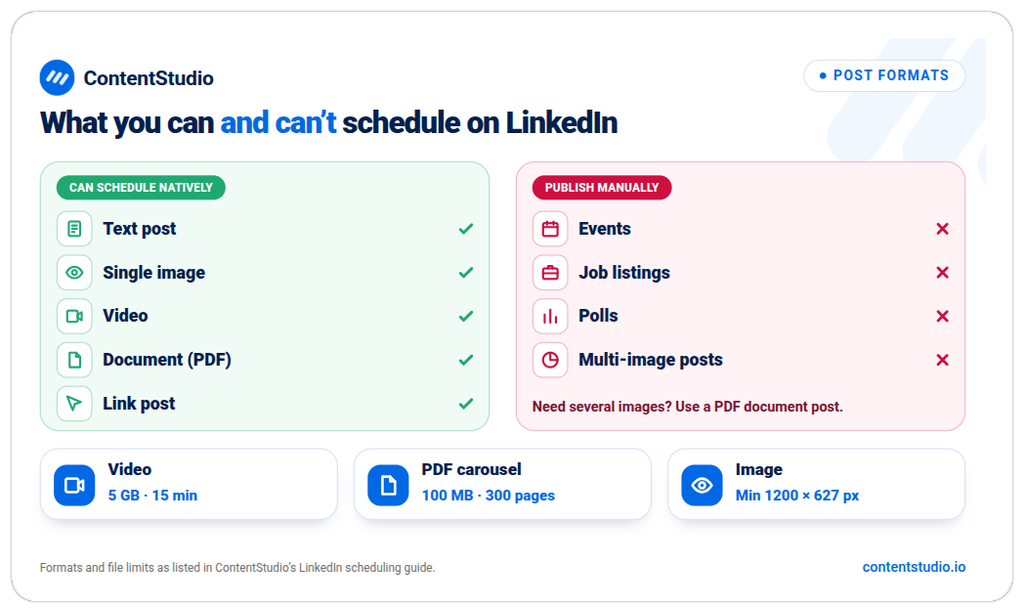
LinkedIn’s native scheduler supports text posts, single image posts, video posts, document posts, and link posts. It does not support events, job listings, polls, or multi-image posts (multiple images in a single post, rather than a document carousel). Those formats must be published manually at the time you want them live.
After scheduling, you can find your queued posts through the same composer:
This opens a list of every post currently in your scheduled queue, with its publication date and a preview of the content. If you have previously scheduled posts, LinkedIn may also show a Scheduled posts shortcut link in the left sidebar of your home feed, below your profile card. Either path leads to the same list.
Scheduling posts on a LinkedIn company page follows the same general flow as a personal profile, but with one important prerequisite: you must have Admin or Content Admin access to the page. If you do not have the right permissions, you will not see the scheduling option for the page.
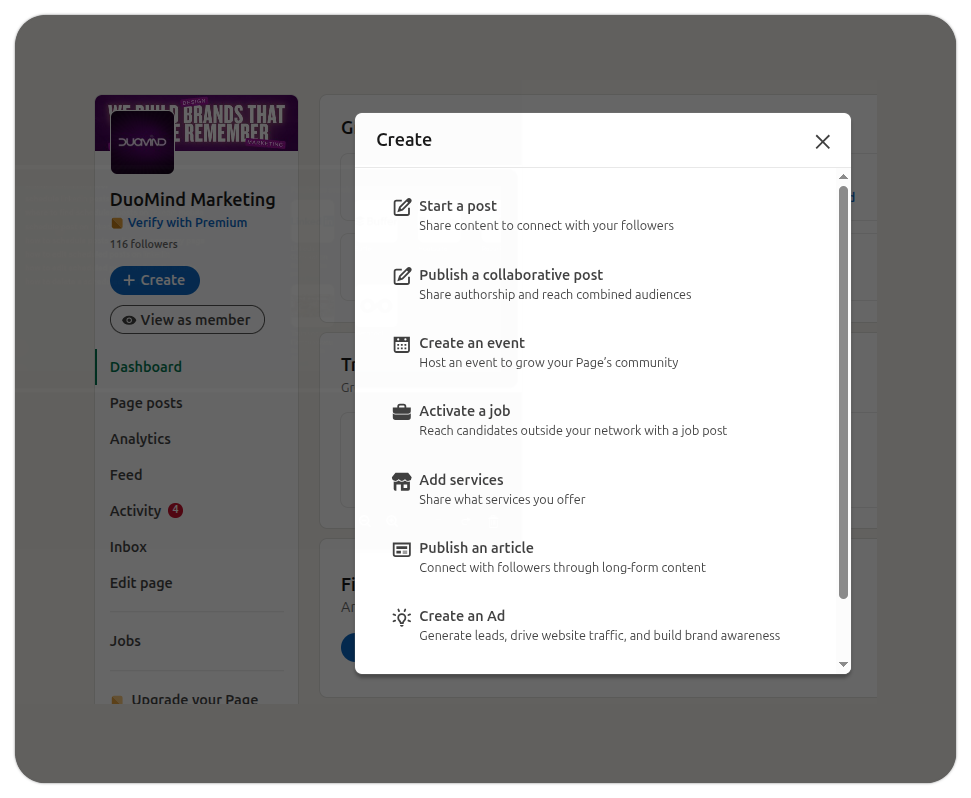
Here is how to schedule from a company page directly:
Scheduled company page posts are stored separately from personal profile scheduled posts. To find them, follow the same path: open the composer on the company page, click the clock icon, and select View all scheduled posts.
Company pages have an additional audience targeting option that personal profiles do not. In the composer, you can restrict who sees the post by language, geography, job function, seniority, company size, or industry before you schedule it. This targeting option appears in the visibility settings, typically accessible through a globe or audience icon in the composer toolbar.
For a complete walkthrough of managing and growing a company page, including settings, content formats, and analytics, the LinkedIn company page covers all of it.
If you are managing a company page for B2B marketing and want to connect scheduling to a broader strategy, the B2B LinkedIn marketing overview explains how content types and posting cadence affect pipeline.
LinkedIn’s mobile app supports scheduling for both personal profiles and company pages. The steps are slightly different from desktop because the interface is compressed, and the clock icon is placed in the upper part of the composer rather than the lower right.
Scheduling on the mobile app follows the same logic as desktop, but the interface is arranged differently. The clock icon sits at the top of the composer rather than the lower right, and the steps are slightly more compact. Here is the exact path.
Scheduling from a company page on mobile requires navigating to the page first, rather than composing from your personal feed. This is the step most people miss when they find a post has gone out on the wrong account.
To see your scheduled queue on mobile:
The scheduled posts list on mobile shows the same content as the desktop view. You can edit, reschedule, or delete any post directly from the mobile list using the three-dot menu next to each entry.
One thing worth knowing: if you scheduled a post on desktop and then immediately check the mobile app, there may be a short sync delay, typically a few minutes, before the post appears in the mobile scheduled queue. This is normal and does not affect publication.
This is one of the most common questions about LinkedIn scheduling, and the reason it confuses people is that LinkedIn does not give scheduled posts their own dedicated section in the navigation. They are accessed through the post composer, which is not an obvious place to look for content you have already created.
LinkedIn does not put your scheduled queue in an obvious place. The most reliable path on desktop runs through the composer itself, not through any menu or notification area.
Method 1: Through the composer (most reliable)
This opens the full scheduled posts list for whichever profile or page you are currently viewing.
Method 2: Left sidebar shortcut
If you have previously scheduled posts, LinkedIn sometimes displays a Scheduled posts link in the left sidebar of your home feed, below your profile photo and headline. Clicking it takes you directly to the scheduled queue without opening the composer first. This shortcut does not always appear, so the composer method is the more reliable path.
The mobile path mirrors the desktop method but uses the upper-right clock icon rather than the lower-right position used on desktop.
Company page scheduled posts are kept entirely separate from your personal profile queue. Accessing them requires being in the company page context before opening the composer.
Scheduled posts for a company page are stored separately from your personal profile’s scheduled posts. To access them, you need to be in the company page context: navigate to the page, open the composer from the page (not from your personal feed), and use the same clock icon path.
If you cannot find a scheduled post where you expect it, the most likely explanation is that it has already been published. Check your recent activity to confirm.
LinkedIn allows you to edit a scheduled post before it publishes. The edit option is available on both desktop and mobile through the scheduled posts list.
The process on desktop gives you the most screen space to review the changes before confirming. Follow these steps to open the draft, make edits, and reschedule.
The mobile edit flow is functionally identical to desktop, though the smaller screen means you may need to scroll to see all post elements before confirming. The key difference from desktop is that the clock icon is in the upper right rather than the lower right of the composer.
When you are in the scheduled posts list, the three-dot menu gives you four options beyond editing. Each one serves a distinct purpose depending on what changed since you originally scheduled the post.
From the same three-dot menu (on both desktop and mobile), you can also:
Note that editing a scheduled post does not change its scheduled publication time unless you explicitly modify it during the edit process.
Deleting a scheduled post on LinkedIn is permanent. Once deleted, there is no way to recover the post from the scheduled queue, so confirm you are deleting the right one before proceeding.
On desktop, the deletion path runs through the same composer entry point you use for scheduling. There is no dedicated delete button outside of this queue view.
On mobile, the steps are the same as on desktop but accessed via the upper-right clock icon in the composer.
If you need to remove a post that has already been published, that is a different process. Published posts are deleted from your profile activity, not the scheduled posts queue.
LinkedIn’s built-in scheduling is useful for individuals posting occasionally. It starts showing its limits when you are managing posting for a team, a company page, or multiple accounts simultaneously.
| Feature | LinkedIn native | Third-party tool |
|---|---|---|
| Scheduling window | Up to 3 months | Unlimited |
| Bulk scheduling | Not supported | Supported |
| Multi-account management | One account at a time | Multiple accounts |
| Approval workflow | Not supported | Supported |
| Team collaboration | Single-user | Multi-user |
| Cross-platform posting | LinkedIn only | All major networks |
| Analytics depth | Basic (LinkedIn native analytics) | Comprehensive, cross-platform |
| Smart timing suggestions | None | AI-powered recommendations |
| First comment scheduling | Not supported | Supported |
| Content calendar view | Not available | Full calendar view |
For most individual users posting a few times a week, the native scheduler is sufficient. For teams, agencies, or anyone managing content at scale, the gaps above are real operational bottlenecks.
LinkedIn supports several distinct post formats, and each one has slightly different preparation requirements. The scheduling mechanics are the same across all of them, but what you need to review and verify before hitting schedule changes significantly depending on the format. Treating every format with the same pre-publish checklist is how outdated links, mis-exported PDFs, and wrong-aspect-ratio images get published.
This section covers the six formats you are most likely to schedule:
Where relevant, it includes the technical specifications LinkedIn enforces, because scheduling a file that exceeds a size limit or uses an unsupported format will fail silently or produce a broken result in the feed.
| Format | Best used for | Native scheduling | First-comment support | Key spec to know |
|---|---|---|---|---|
| Text | Opinions, frameworks, stories | Yes | Via third-party only | No image required |
| Single image | Announcements, event photos, data points | Yes | Via third-party only | Min 1200 x 627 px landscape |
| Video | Demos, talks, explainers, recruiting | Yes | Via third-party only | Max 5 GB, 15 min |
| PDF carousel | Guides, checklists, frameworks | Yes | Via third-party only | Max 100 MB, 300 pages |
| Link post | Blog articles, reports, resources | Yes | Via third-party only | OG image required for clean preview |
| Post with first comment | Link-sharing strategy, source notes | Third-party only | Native not supported | Comment must add standalone value |
A text post is the most versatile format on LinkedIn and consistently one of the highest-performing. It works best when the value is the idea itself:
Text posts do not require a graphic, and adding a decorative image that does not add anything to the point often reduces performance rather than improving it.
Before scheduling a text post:
A single-image post works when one visual can make the message easier to notice or understand. Research from LinkedIn shows that single-image posts generate a 98% higher comment rate than text-only posts.
Before scheduling a LinkedIn image post:
For carousel-style presentation of multiple images, use a PDF document post rather than uploading multiple images as a single post.
Native video on LinkedIn receives roughly five times more engagement than other content types, according to LinkedIn’s own data. Uploading video directly to LinkedIn performs better than sharing a YouTube or Vimeo link, because the platform gives native uploads preferential reach.
LinkedIn’s native video specifications:
Before scheduling a LinkedIn video post:
ContentStudio’s AI video generator can assist with creating LinkedIn-ready video clips from longer recordings, and its clip maker helps trim and format video for the platform before scheduling.
PDF documents are LinkedIn’s equivalent of a carousel. Each page of the PDF becomes a swipeable slide in the feed. This format works well for checklists, frameworks, how-to guides, research summaries, and educational content.
LinkedIn PDF specifications:
Before scheduling a LinkedIn PDF carousel post:
For a deeper look at creating effective carousel content, the LinkedIn carousel posts cover structure, cover design, and what makes people swipe through to the end.
ContentStudio supports PDF carousel scheduling for both LinkedIn personal profiles and company pages.
Link posts share an external URL with a preview card showing the destination’s title, description, and image.
Before scheduling a LinkedIn link post:
Scheduling a first comment alongside a LinkedIn post allows you to add a resource link, source attribution, event registration URL, or additional context without making the main caption overly long.
LinkedIn’s native scheduler does not support first-comment scheduling. Third-party tools, including ContentStudio, support this as part of the standard post scheduling workflow.
Before scheduling a post with a first comment:
ContentStudio’s LinkedIn scheduling workflow is designed for teams that need more than a date and a time picker. It adds approval routing, multi-account management, a unified content calendar, and analytics in a single workflow, without requiring everyone on the team to have access to the LinkedIn credentials.
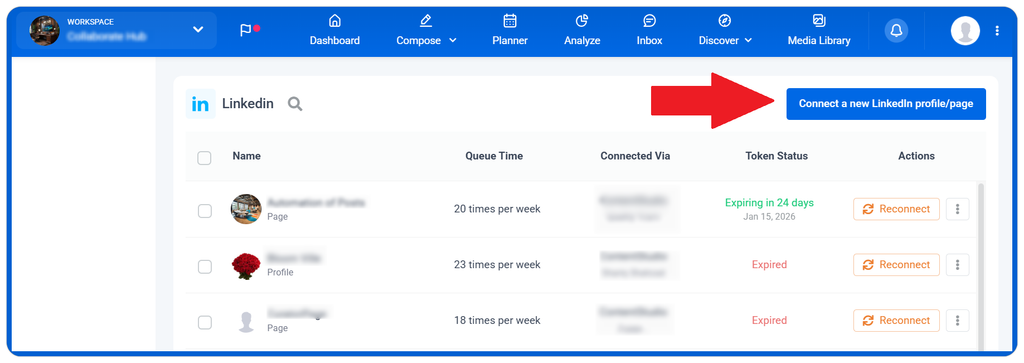
The connection step is where access problems surface most often. Taking two minutes to verify the points below before connecting saves a call with a client or an IT team later.
In your ContentStudio account, go to Social Accounts and connect the LinkedIn profile or company page you are authorised to manage. ContentStudio’s EasyConnect option is designed for agencies and teams who need to connect client pages securely without requesting login credentials.
Before connecting, verify:
This step matters more than it appears. A single workspace containing accounts for multiple clients, brands, or business units is how content ends up in the wrong place. The ContentStudio workspaces feature keeps everything separated at the structural level so team members only see and access what they are responsible for.
If you manage more than one brand, client, or business unit, keep each in a separate ContentStudio workspace. A workspace separates social accounts, content calendars, drafts, media libraries, approval processes, and reporting. This prevents a common and costly error: scheduling a post intended for one client to another client’s page.
Open ContentStudio’s social media composer and select the LinkedIn profile or company page before writing the caption. The account selection matters at this stage because a post for a company page, a founder’s personal profile, or a recruiter’s account may need a different tone, different evidence, and a different call to action.
Beyond the caption and media, ContentStudio’s composer supports several elements that LinkedIn’s native interface handles poorly or not at all. Adding them here, before the post is scheduled, ensures nothing is missing when the post goes live.
For hashtag strategy, the LinkedIn hashtag breakdown covers which tags are worth targeting and how many to use per post.
In the composer, add:
ContentStudio’s AI Studio can generate caption drafts, suggest hashtags, and assist with repurposing content across formats. The output should be treated as a starting point, not a finished post.
Use ContentStudio’s post preview to review the full publishing asset before routing it for approval. Check:
The approval step is where the native LinkedIn scheduler falls short for most teams. Without it, a post can go from draft to live without anyone other than the author seeing it. ContentStudio’s approval workflow routes the post to the right reviewer and keeps all feedback, edits, and sign-off decisions tied to the actual draft, not floating in a separate email thread or chat.
Before scheduling, route the post to the appropriate reviewer using ContentStudio’s approval workflow. Reviewers can include a content manager, brand manager, subject-matter expert, compliance reviewer, client, or campaign owner.
A useful approval request includes the full public experience: the final caption, media asset, first comment, link destination, publishing account, proposed date and time, and any specific questions for the reviewer. ContentStudio keeps all feedback and revisions associated with the draft, so decisions and changes are traceable rather than scattered across email and chat.
ContentStudio offers more than a single scheduled date and time. Depending on the post’s purpose, a different publishing method may be more appropriate.
After approval, choose the appropriate action:
This step happens after the individual post is approved but before anything goes live. The calendar view reveals patterns that a single-post view cannot show: a week with five posts and then a ten-day gap, two posts covering the same topic on consecutive days, or a month where every post is a link to a blog with no original content in between.
Use ContentStudio’s content calendar to review the overall publishing plan before anything goes live. Look for:
Calendar planning makes it possible to apply a deliberate LinkedIn content strategy rather than publishing reactively.
Automation handles the publishing. The strategic value of LinkedIn comes from what happens after the post is live. A few practical habits after each post goes out make a significant difference to the account’s long-term trajectory.
Scheduling ends at publication. The relationship work begins after it.
After a post goes live:
ContentStudio’s analytics module covers post-level and account-level reporting across all connected profiles and pages in one dashboard.
There is no single “best time” that works for every account. Optimal posting times depend on your specific audience’s geography, job function, and habits. That said, aggregate research provides a useful starting point.
Timing research from multiple sources, including Sprout Social’s dataset of thousands of accounts, points to the same general pattern. The variation between accounts is real, but the baseline below gives you a defensible starting point while your own analytics accumulate.
Multiple studies consistently identify Tuesday through Thursday as the strongest days for LinkedIn engagement, with Wednesday typically showing the highest overall performance. The research from Sprout Social, using data from thousands of accounts, identified the best window globally as Tuesday through Thursday, 10 AM to noon.
Content published on Saturday and Sunday generally underperforms, which reflects LinkedIn’s professional orientation: most users engage with the platform during work hours or during their commute, not on weekends.
These windows are based on aggregate engagement data across account types. They are a starting point, not a rule. Your actual audience’s behaviour, which your own analytics will show you over time, should take precedence over any external benchmark.
| Audience | Best days | Best time window |
|---|---|---|
| General professional | Tue, Wed, Thu | 9 AM to 12 PM |
| B2B decision-makers | Wed, Thu | 8 AM to 10 AM |
| Job seekers | Mon, Tue | 8 AM to 10 AM |
| Recruiters | Wed, Thu | 10 AM to 12 PM |
| Executives | Tue, Wed | 7 AM to 9 AM |
These are starting points, not rules. Your own LinkedIn analytics will show when your specific audience is most active and most likely to engage.
Time zone mismatch is one of the most common reasons an account with good content consistently underperforms on reach. A post that is scheduled for 9 AM in the content manager’s time zone may be hitting a completely different part of the day for the audience it was written for.
If your audience is distributed across regions, picking a single posting time becomes harder. A post scheduled for 9 AM EST reaches a US East Coast audience in the morning, but a European audience in the early afternoon and an Asia-Pacific audience at midnight.
For accounts with a truly global audience, scheduling two posts of similar content timed for different regions is more effective than one post trying to serve everyone.
Smart scheduling works best for accounts that already have a data history. For accounts with fewer than three months of consistent posting, the algorithm defaults to industry benchmarks until enough engagement signals build up.
ContentStudio’s smart scheduling analyses historical engagement data for each connected account and recommends the times when that specific audience is most likely to engage. Rather than applying a generic best-practice time, it uses your account’s own performance patterns.
For new accounts that do not yet have enough data, it falls back to industry benchmarks while the account builds history.
Scheduling handles the logistics of when your content goes out. What it cannot do is make the content itself better. These practices address the quality side of the equation and are the difference between a consistent posting schedule that builds something and one that just fills the feed.
The posts that generate genuine engagement on LinkedIn are the ones that feel directed at someone in particular: a specific job title, a specific challenge, a specific moment in a buyer’s journey. Vague professional advice for “marketers” rarely lands as well as a clear observation aimed at a content team manager dealing with a specific problem. Before scheduling any post, define who it is for.
LinkedIn truncates captions after approximately two to three lines before the “see more” prompt. The opening lines carry the entire burden of getting someone to keep reading. A first line that is generic, starts with “I,” or opens with a question that does not immediately pay off loses most readers before they ever reach the substance of the post.
LinkedIn’s algorithm consistently gives more organic reach to content that keeps users on the platform. A video uploaded directly to LinkedIn reaches more people than a link to a YouTube video. A PDF carousel uploaded as a LinkedIn document gets more impressions than a link to an external deck. Schedule native formats wherever possible.
LinkedIn hashtag research consistently shows that three to five relevant hashtags outperform fifteen. Use one or two broad hashtags for discoverability, one or two topic-specific hashtags for niche relevance, and one branded hashtag if your organisation uses one.
If you routinely add a link, a source, or a follow-up resource in the first comment rather than the caption, do this as part of the scheduled workflow so it does not get forgotten. ContentStudio supports first-comment scheduling as part of the standard publishing flow.
A post that looks fine in isolation may look redundant next to the one scheduled for the day before. A calendar view reveals duplicate angles, back-to-back promotional messages, and gaps in your content mix that a single-post view cannot show.
A scheduled post that receives five thoughtful comments and goes unanswered for eight hours signals low investment. Scheduling is not a substitute for presence. Block a short window after each scheduled post to respond, acknowledge, and participate.
Waiting a month to check results means scheduling three or four weeks of content without the feedback that could improve it. A weekly look at which posts earned reach, which generated saves, and which prompted meaningful comments is enough to steadily raise quality over time.
Using ChatGPT for LinkedIn and other AI writing tools can help generate caption drafts and suggest angles, but the specific insight, the real example, and the genuine point of view still need to come from the person or brand publishing the post. AI-generated content that reads like AI-generated content earns lower engagement than content with a clear human voice.
The most common cause of an inconsistent posting schedule is not a lack of scheduling tools. It is a lack of content ideas ready to execute. A working LinkedIn post ideas bank reduces the daily decision of what to write to a matter of picking and drafting rather than starting from nothing.
A schedule built entirely on text posts leaves reach potential on the table. Carousels earn saves. Video earns watch time and autoplay reach. Native documents perform better than external links. Varying formats across your calendar means different posts serve different parts of your audience’s attention rather than all competing for the same response.
Scheduled content drives people to your profile, and if the profile is incomplete, the context for your expertise is missing. A well-optimised LinkedIn profile closes the loop between a strong post and a concrete action: a connection request, a DM, or a website visit.
When someone leaves a substantive comment on a scheduled post, a short, genuine reply in DMs can turn that interaction into a conversation. This is the relationship work that scheduling creates time for.
Most LinkedIn presence problems are not content problems. They are consistency problems, and consistency is what scheduling solves.
LinkedIn’s native scheduler gets you started. For anything involving a team, a company page, client accounts, or content that needs review before it goes live, a proper tool makes the difference between a process that holds up and one that quietly breaks down every few weeks.
If you want to see how that looks in practice, ContentStudio’s LinkedIn scheduler is free to try for 14 days.
No. LinkedIn does not distinguish between a scheduled post and a manually published one. Your followers see it in their feed when it goes live, with no indication of how or when it was prepared.
No. LinkedIn’s API treats natively scheduled posts and third-party scheduled posts the same way. Reach is determined by content quality, engagement signals, and posting time, not by which tool published the post.
Not with LinkedIn’s native scheduler, which publishes to one account at a time. Third-party tools like ContentStudio let you select multiple profiles and pages in the same composer window and publish or schedule to all of them in one action.
If the account disconnects before the scheduled time, the post will not publish. Most scheduling tools send an alert when a connection breaks. In ContentStudio, the account status is visible in the Social Accounts settings, and reconnecting before the scheduled time resolves the issue.
Yes. ContentStudio supports agency workflows with separate Workspaces, multiple client accounts, content calendars, media organization, approval workflows, scheduling queues, engagement management, analytics, and white-labeled or shareable reporting.
LinkedIn does not publish a specific frequency cap, but audience fatigue is a real effect. Multiple studies suggest that posting more than once per day tends to dilute engagement per post rather than increase overall reach. One to two posts per day is the practical upper limit for most accounts.
LinkedIn does not have a native repost or reshare function for your own content. You can manually copy the caption and repost it as a new post. Some third-party tools support content recycling, which re-queues evergreen posts after a set period without requiring you to recreate them.
LinkedIn’s native scheduler does not publish a cap on the number of posts that can sit in the queue, but it limits scheduling to three months in advance. Third-party tools have no practical cap on queue size.
Hassaan Khan is a Senior Contributing Writer and Editor at ContentStudio and a writer for SaaS and e-commerce brands, with bylines at SEMrush, ThriveGlobal, and BloggingCage. He covers social media marketing, technical SEO, and analytics, from Instagram impressions to hashtag analytics, and reviews articles for technical accuracy and SEO soundness.
View all posts by Hassaan KhanRecommended for you
LinkedIn Reach: What it means and how to reach the right people
LinkedIn Company page guide: How to create, optimize, and grow it
12 best LinkedIn analytics tools in 2026
LinkedIn performance metrics: What to track, calculate, and compare