
15 best social media management tools to plan, schedule, and grow in 2026
Jul 16, 202629 minutes
ContentStudio API plan is now available. Create automations using Claude, Zapier, n8n, make, etc. Explore plan!
Written by
Maryam HaqPublished
Updated

The ContentStudio Zapier integration is here, and it’s about to save you from something that’s eating up way too much of your time: manually posting content across multiple social platforms. It’s 2025, and if you’re still having to switch between five different apps in your morning routine, we need to fix that.
The ContentStudio x Zapier automation setup we’re about to walk you through will make you feel like you’ve hired a personal assistant, one that skips the awkward small talk. More than just another “set it and forget it” promise, this automation is what saves marketing teams from hours of monotonous routine tasks so they may spend that time over more productive pursuits.
If you’ve never heard of Zapier, here’s the quick version: it’s an automation platform that connects different apps without requiring any code. You set up simple rules like “when this happens in App A, do that in App B,” and Zapier handles the rest. Supporting thousands of apps, it acts as the universal adapter for your entire tech stack.
For ContentStudio users, this means you can pull content from wherever it lives (your blog, spreadsheets, or email tools) and automatically push it to your social accounts without you manually moving content around.
Let us elaborate on this for the common folk. Think of Zapier as the universal translator between all your favorite apps. It’s the friend who speaks everyone’s language at the party and gets them all talking to each other. The ContentStudio Zapier integration is exactly that: a bridge that connects ContentStudio with over 8,000 other apps you’re probably already using.
As a social media manager, we know your content doesn’t live in just one place. You’ve got your RSS feed pumping out fresh blog posts. You’ve got your content calendar in Notion. Maybe you’re getting leads through Google Forms or tracking ideas in Airtable. Normally, you’d need to manually grab that content and paste it into ContentStudio to publish across multiple networks. With this integration, that entire process happens automatically.
The integration works through the ContentStudio API, allowing you to create automation workflows called “Zaps,” in Zapier. To put it simply, an automation workflow is when X happens in one app, Y happens in ContentStudio. New blog post goes live? Boom, it’s scheduled across your social accounts. Someone fills out a form? Their info gets turned into a welcome post. You get the idea.
What makes this actually powerful and not just another tech buzzword is that ContentStudio now supports actions like creating social posts, deleting posts, and pulling data about your workspaces and social accounts. That means you can build pretty sophisticated workflows without touching a line of code.
Also Read: ContentStudio Make integration: Save time with automated scenarios
Alright, let’s get your accounts talking to each other. This is easier than assembling IKEA furniture, we promise.
First, you need your API key. Think of this as the secret handshake that proves you actually own your ContentStudio account. Here’s how to grab it:
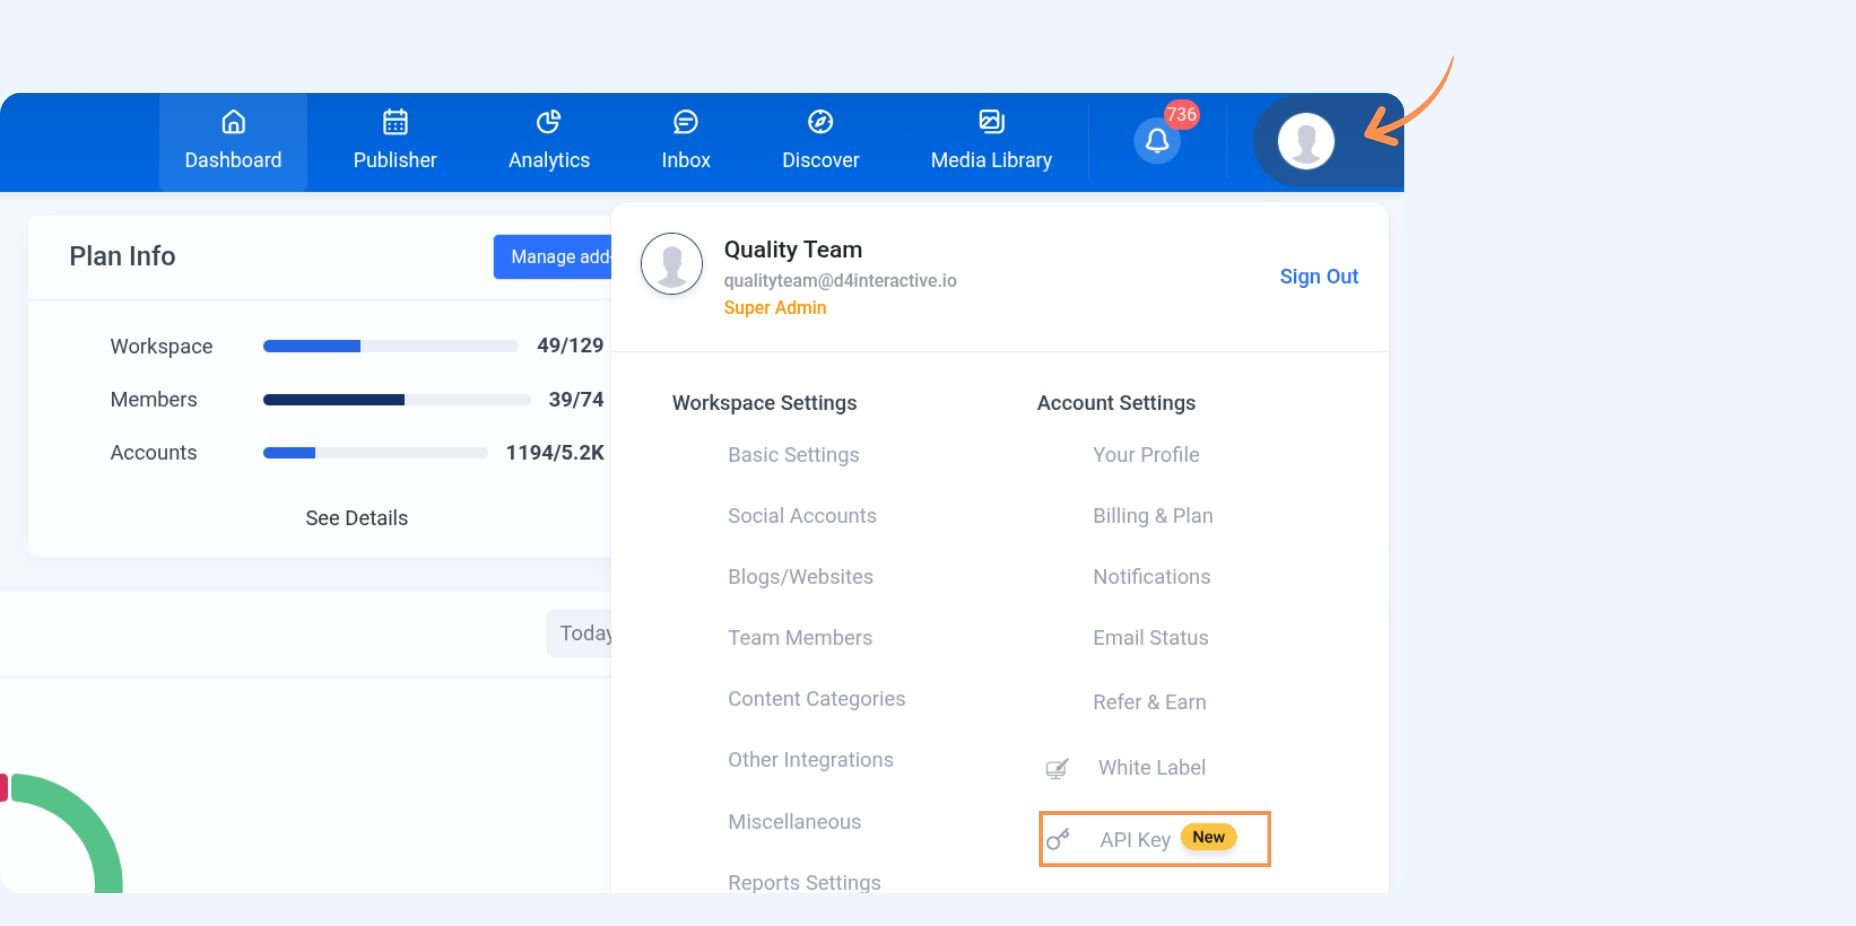
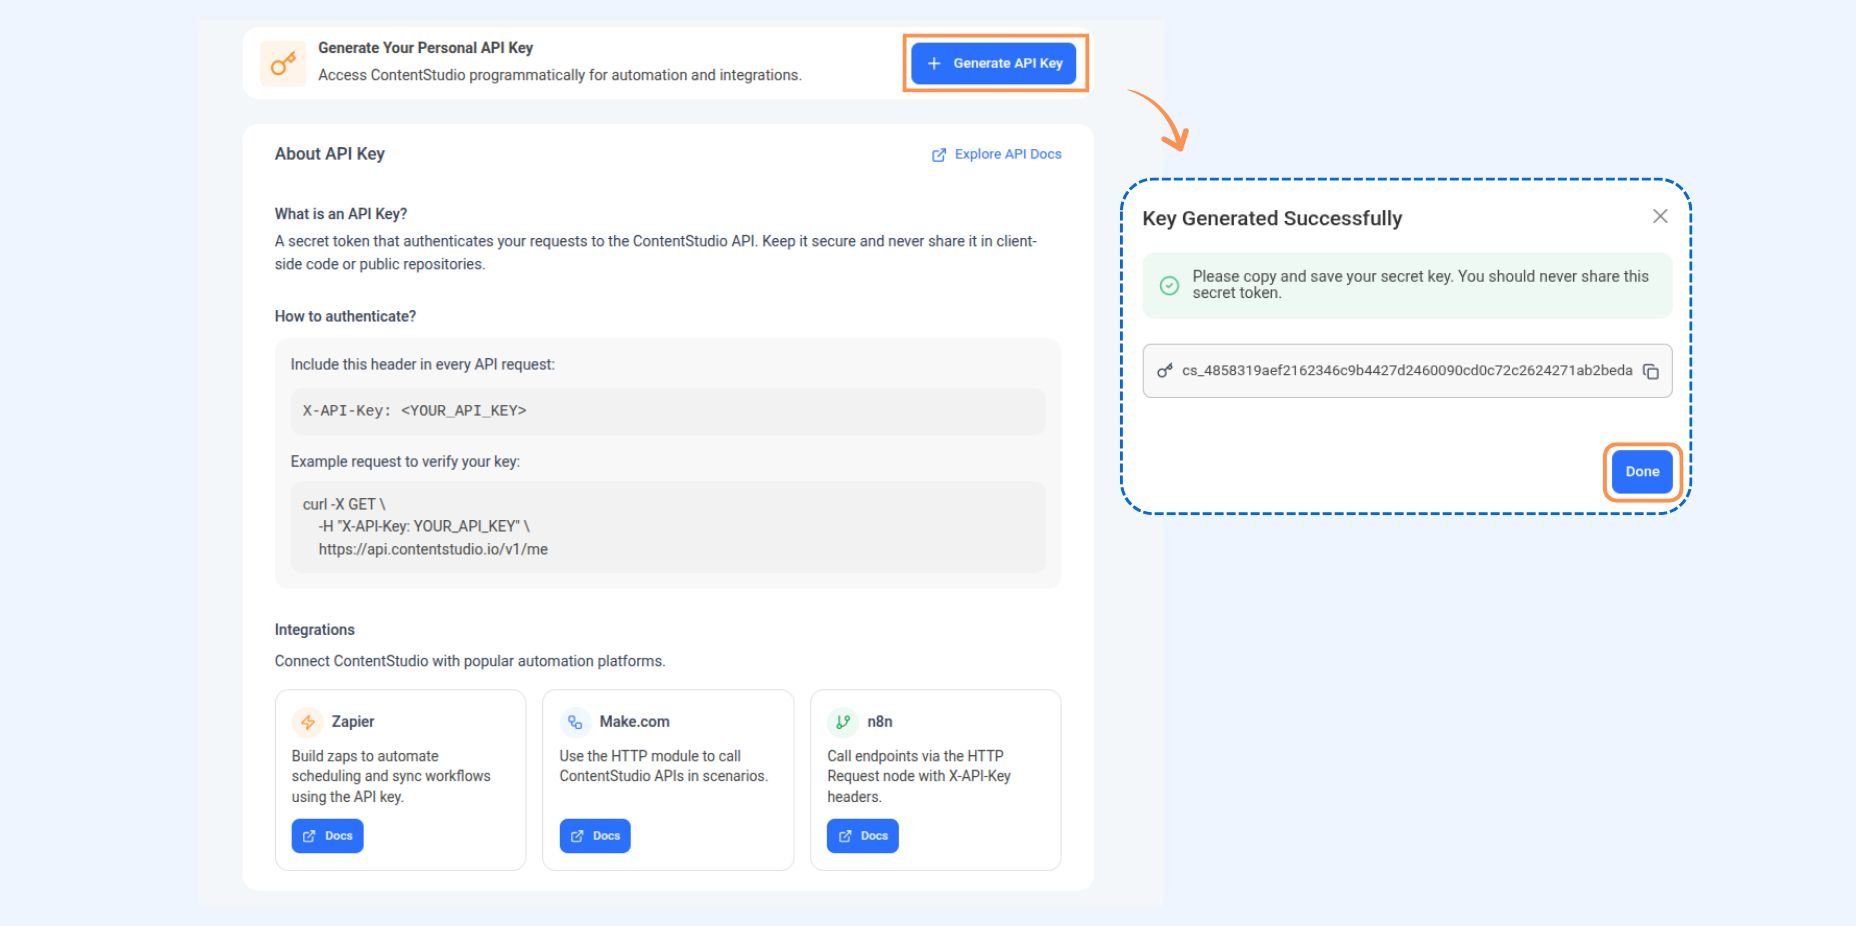
Keep this somewhere safe. You’ll need it in a second, and you definitely don’t want to share it publicly. It’s like your house key, but one you don’t leave under the doormat.
Head over to Zapier and sign up if you haven’t already. Their free plan is pretty generous, so you can test this out without pulling out your credit card.
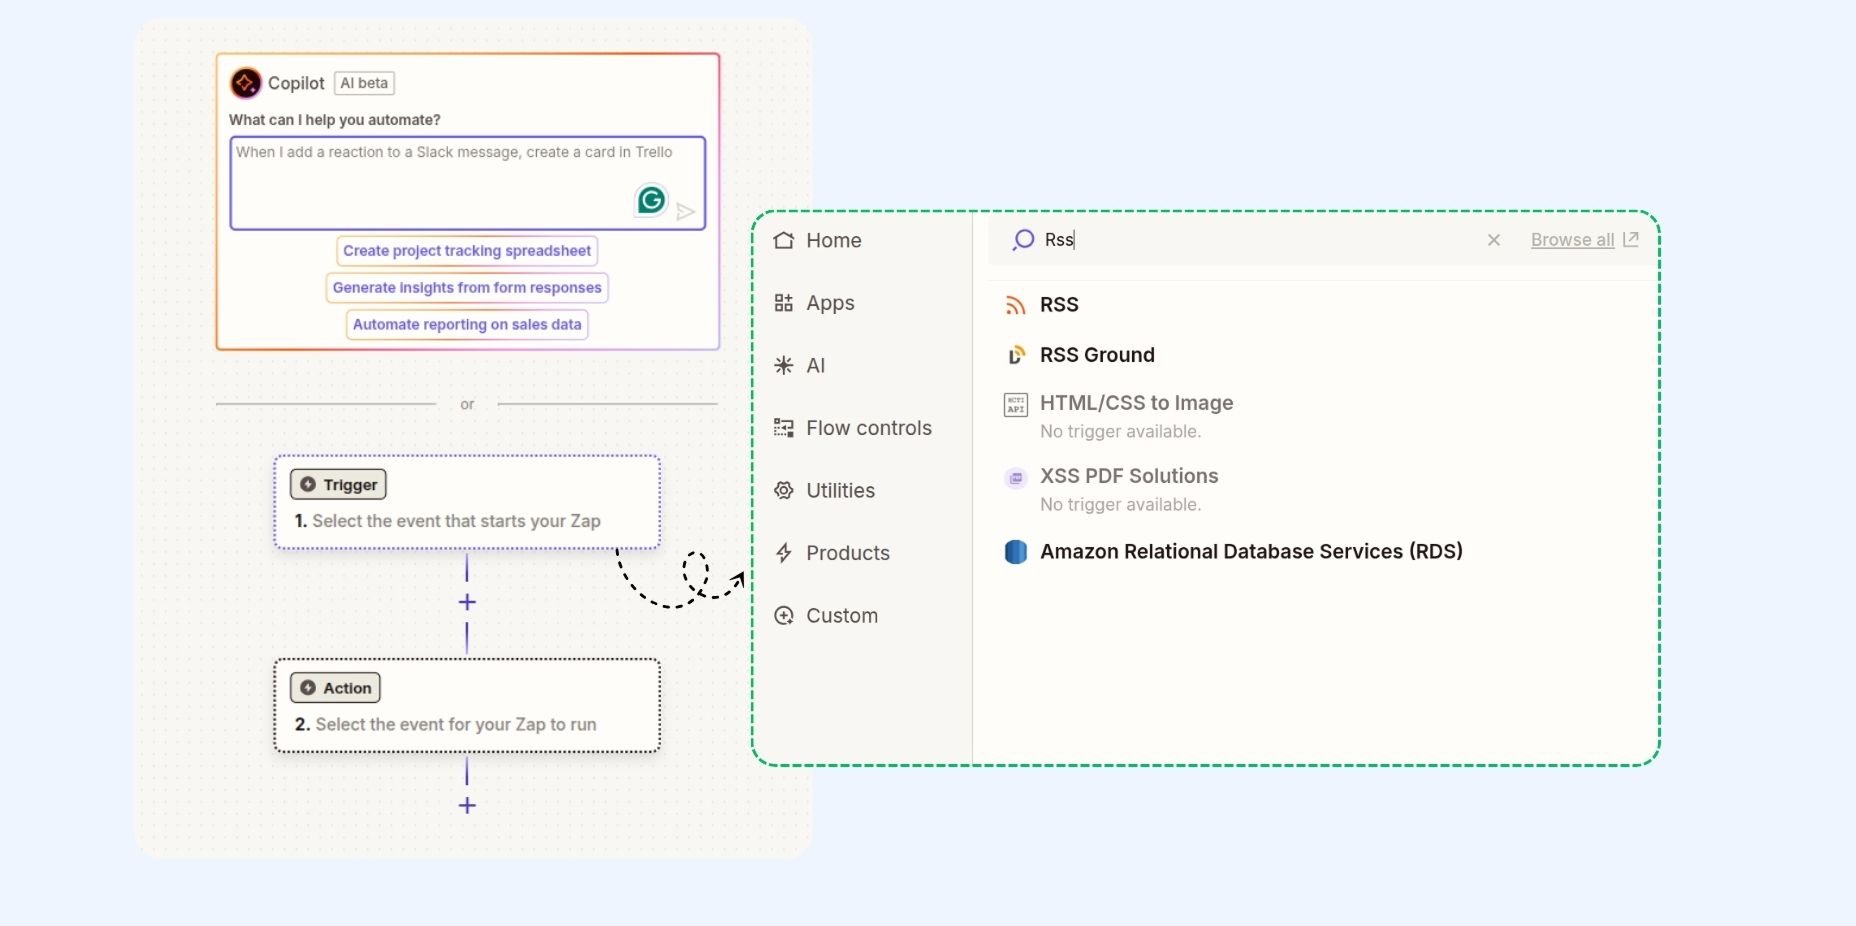
Now, create a new Zap. You’ll see two main parts: the Trigger and the Action.
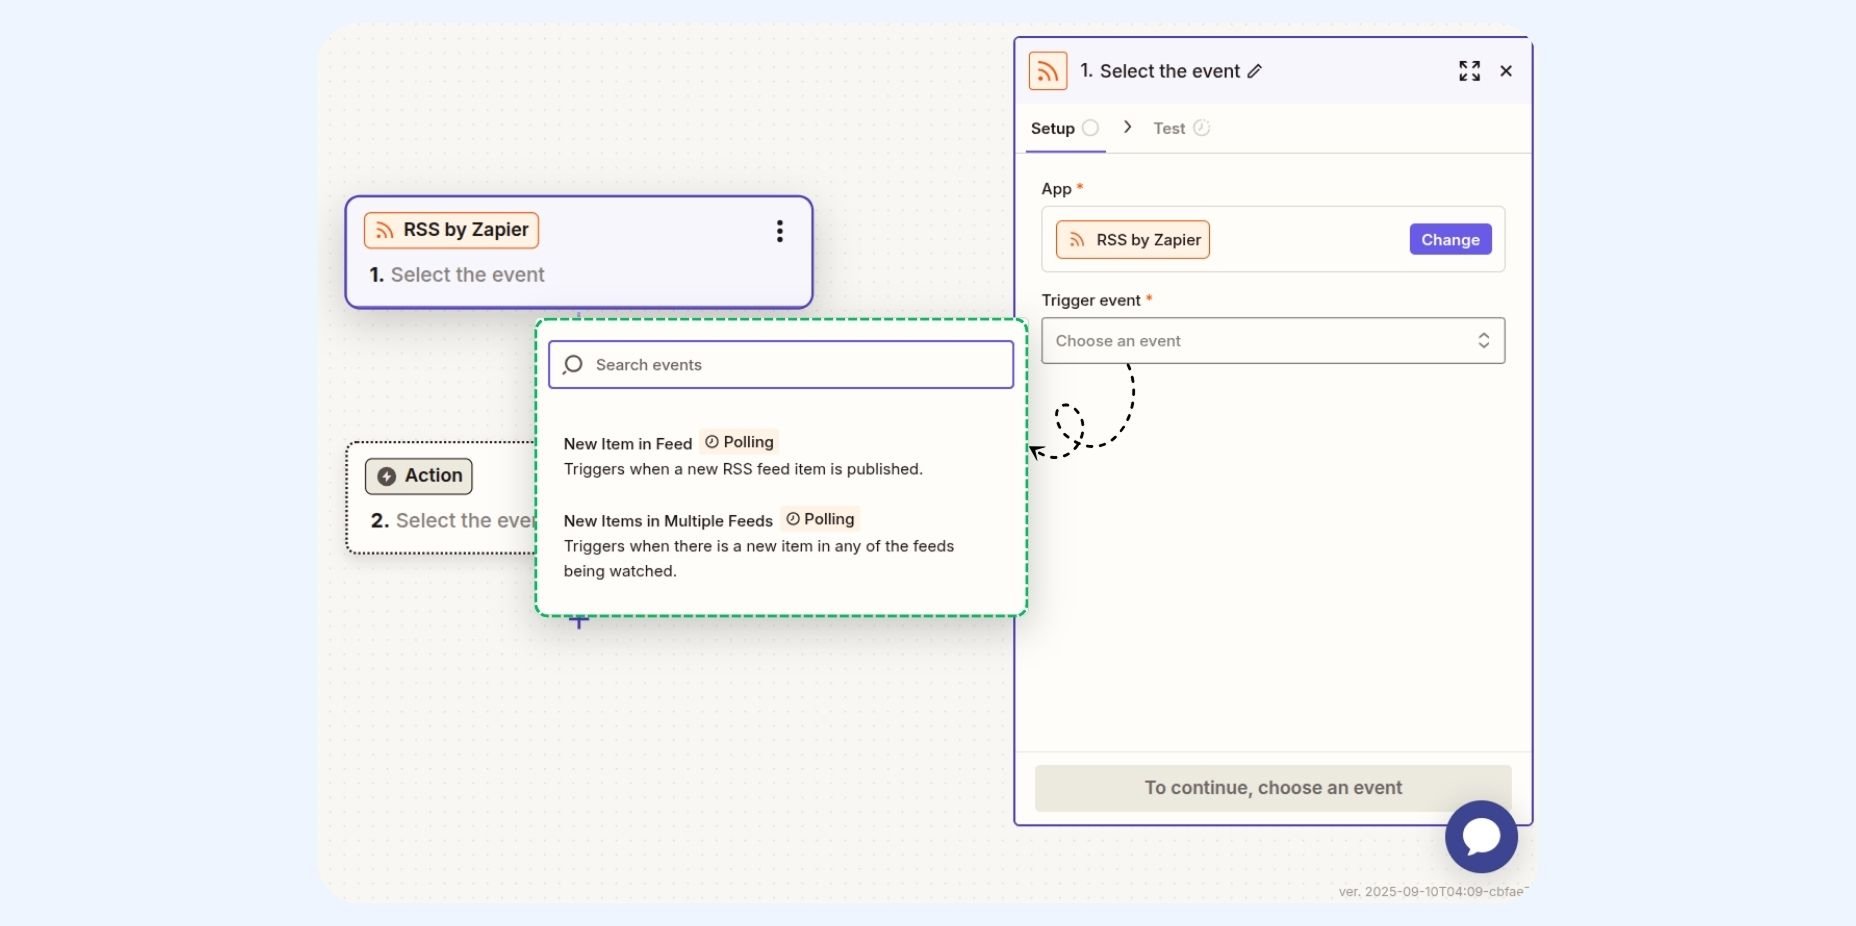
The Trigger is the “when this happens” part. This could be anything: a new item in your RSS feed, a new row in your Google Sheet, a new email with a specific label, you name it. For this example, let’s say you want to auto-post whenever your blog publishes something new. You’d choose RSS by Zapier as your trigger app, select “New Item in Feed,” and paste in your blog’s RSS URL.
The Action is the “do this” part. This is where ContentStudio comes in.
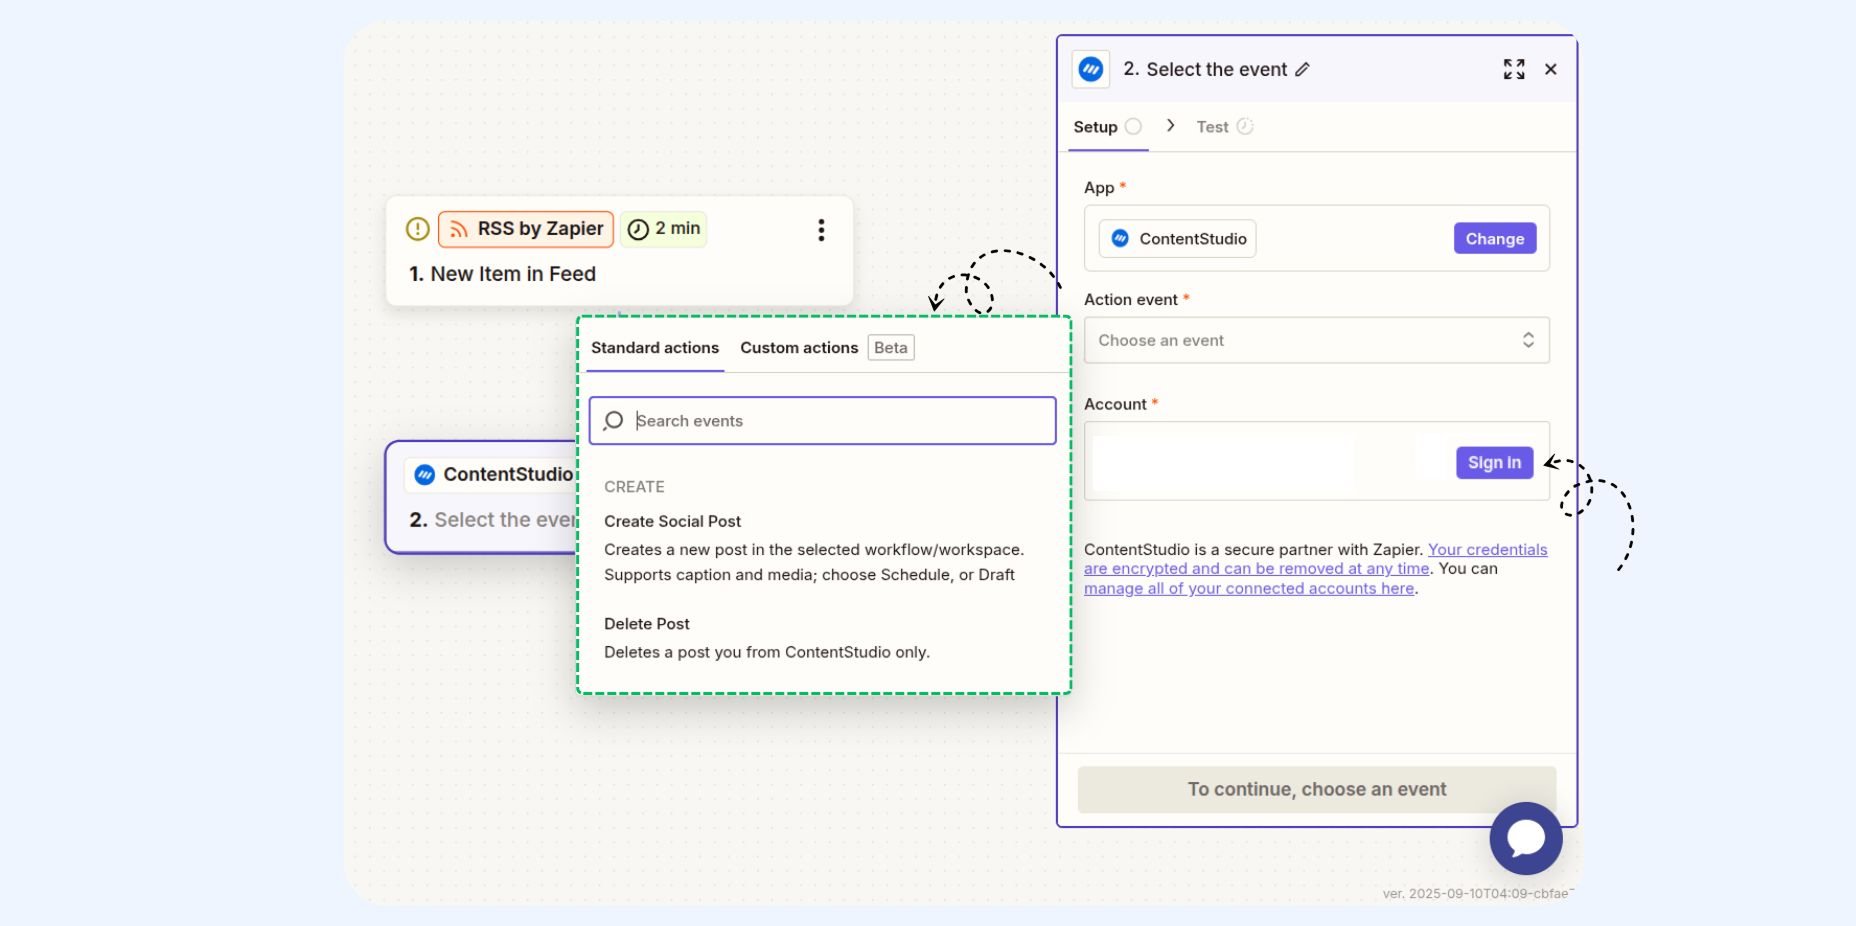
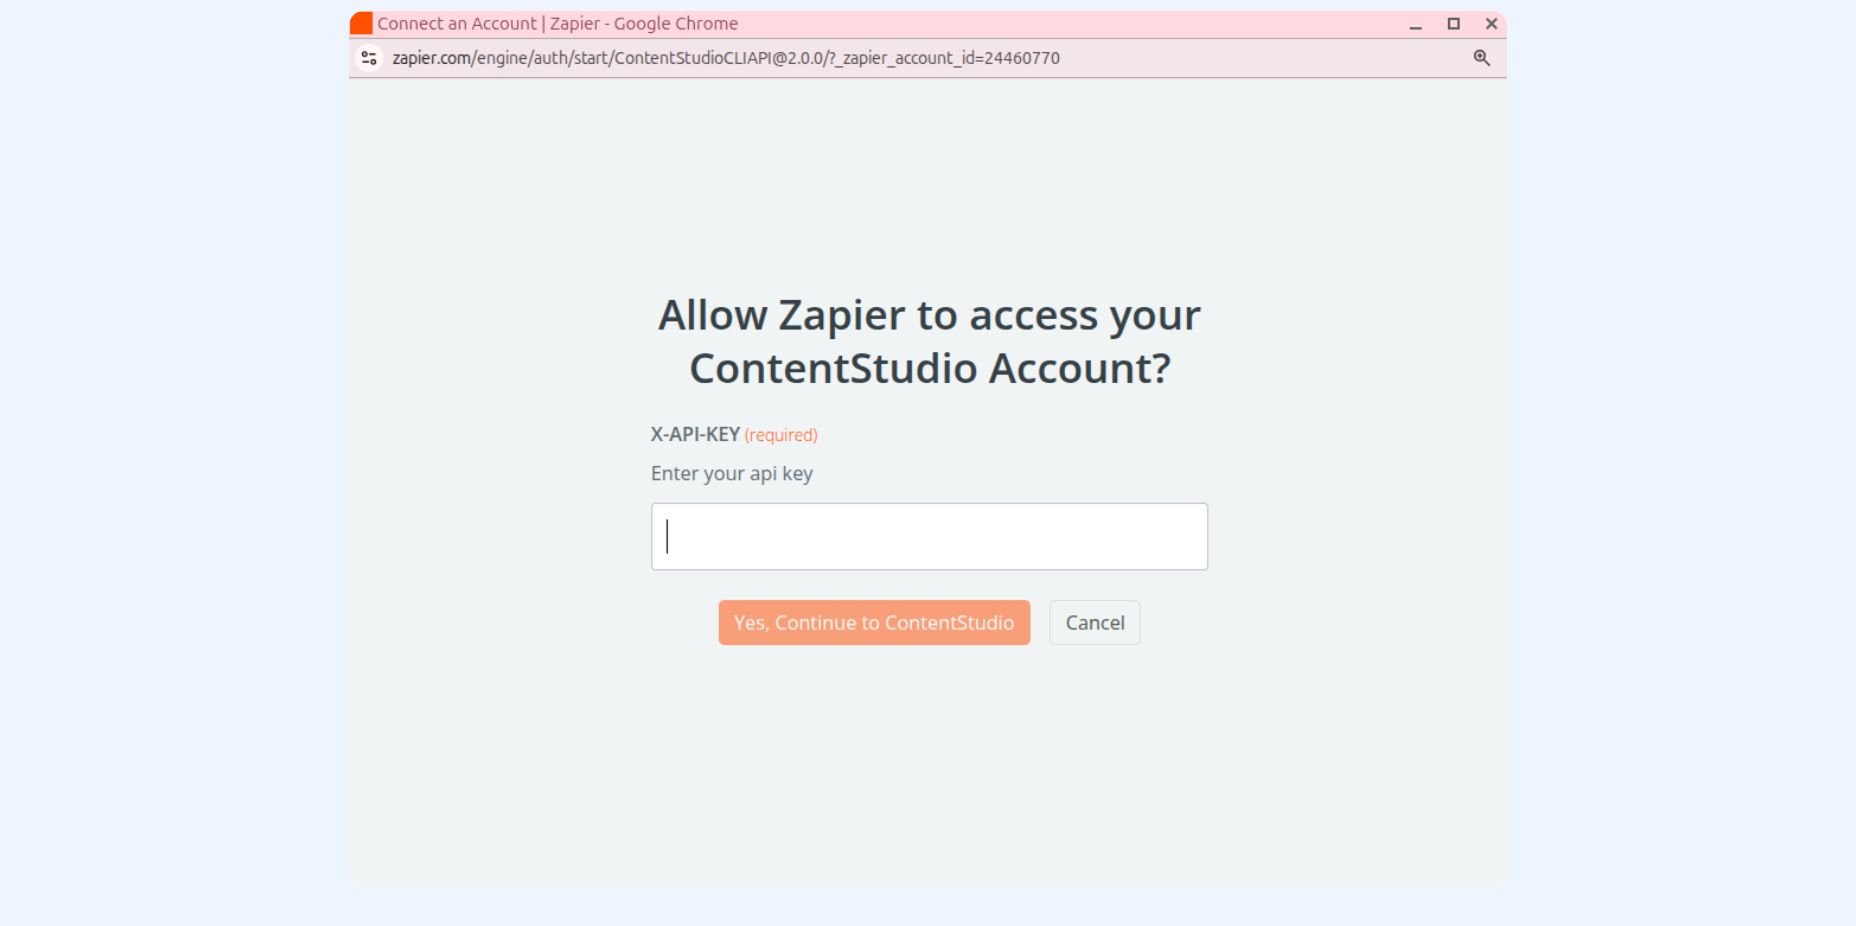
Select ContentStudio as your action app, then choose “Create Social Post” as the event. Zapier will ask you to connect your ContentStudio account. This is where you paste that API key you grabbed earlier.
Once you’re connected, you’ll see a form asking for some details.
Here’s where the magic happens. You’ll need to fill in:
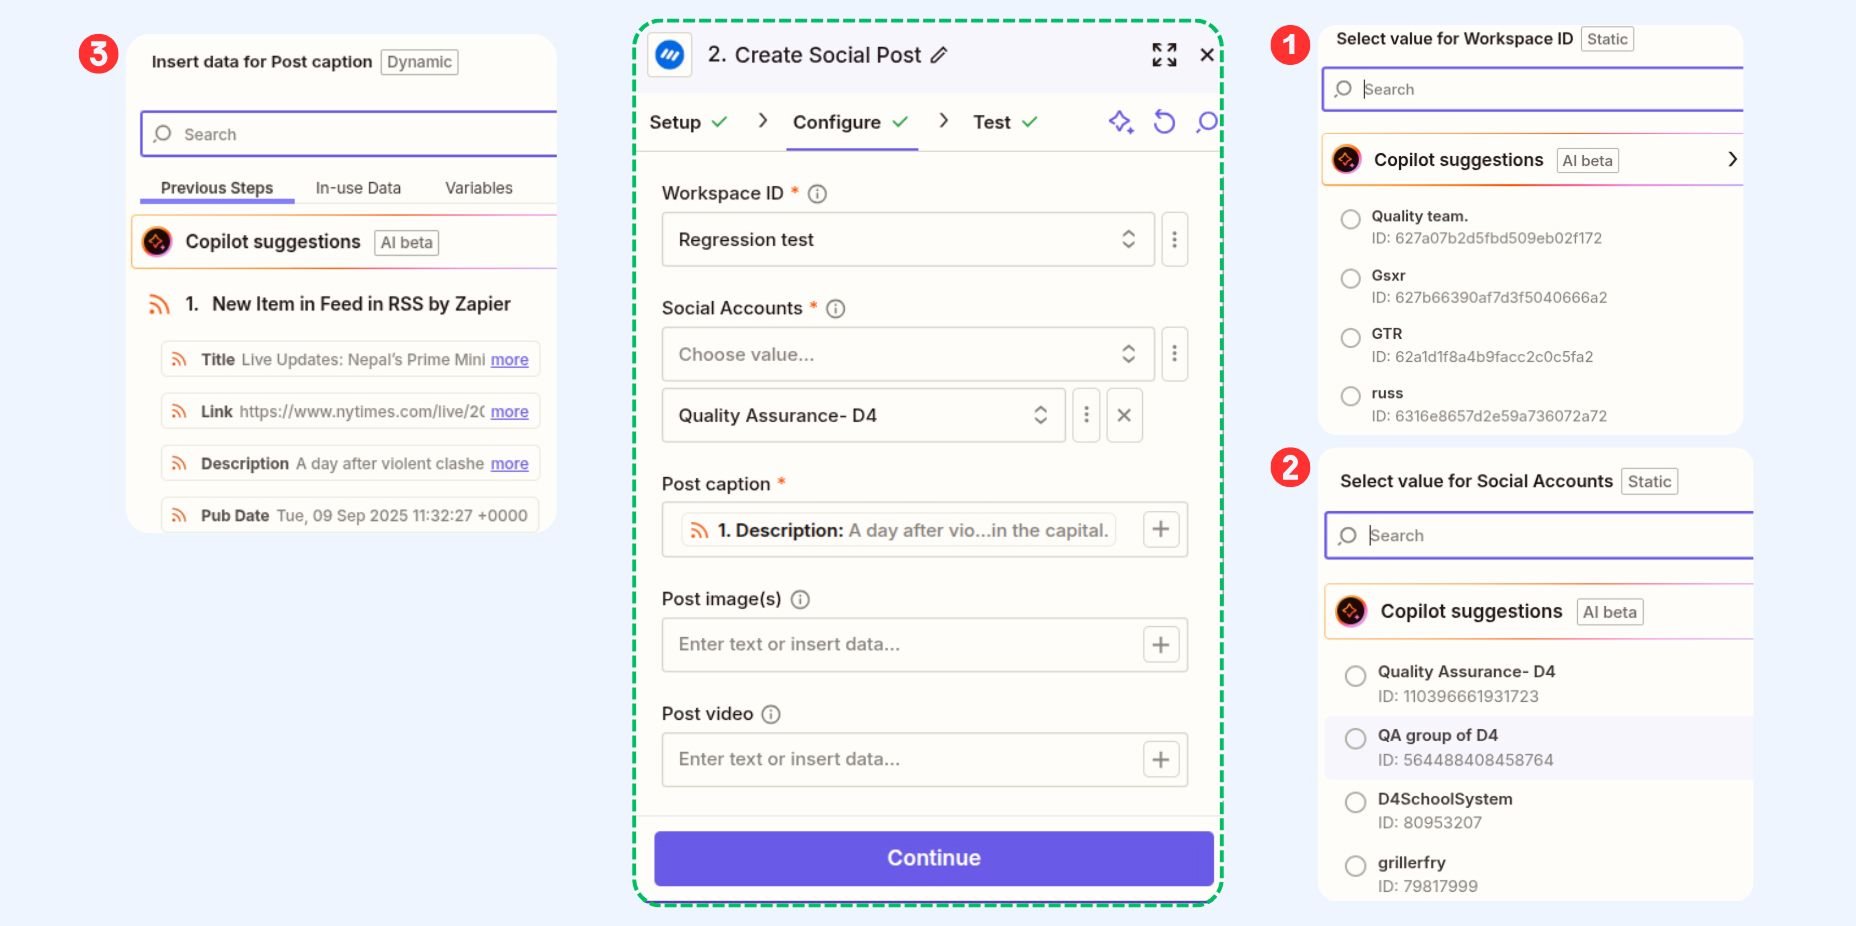
Workspace: Select the workspace you want to create the automated workflow for.
Social accounts: Pick which social platforms this post should go to. You’ll see all your connected accounts in a dropdown. Want to post to Twitter and LinkedIn but skip Facebook? Just select those two.
Post caption: Rather than typing the text here, you’ll instead pick dynamic fields from your trigger app. So if your trigger was an RSS feed, you might choose the blog post title, or its description, or combine them. This is what makes it actually automated instead of just a different place to manually enter text.
Post images or videos (optional): Got visuals? Drop in the image URL from your trigger app. You can add multiple images separated by commas or a single video. Just make sure they’re publicly accessible URLs, not files sitting on your laptop.
Posting schedule (optional): Want this to go out immediately, or schedule it for later? Enter a date and time in the format YYYY-MM-DD HH:mm:ss. So if you want it to post on March 15, 2025 at 3:30 PM, you’d type: 2025-03-15 15:30:00.
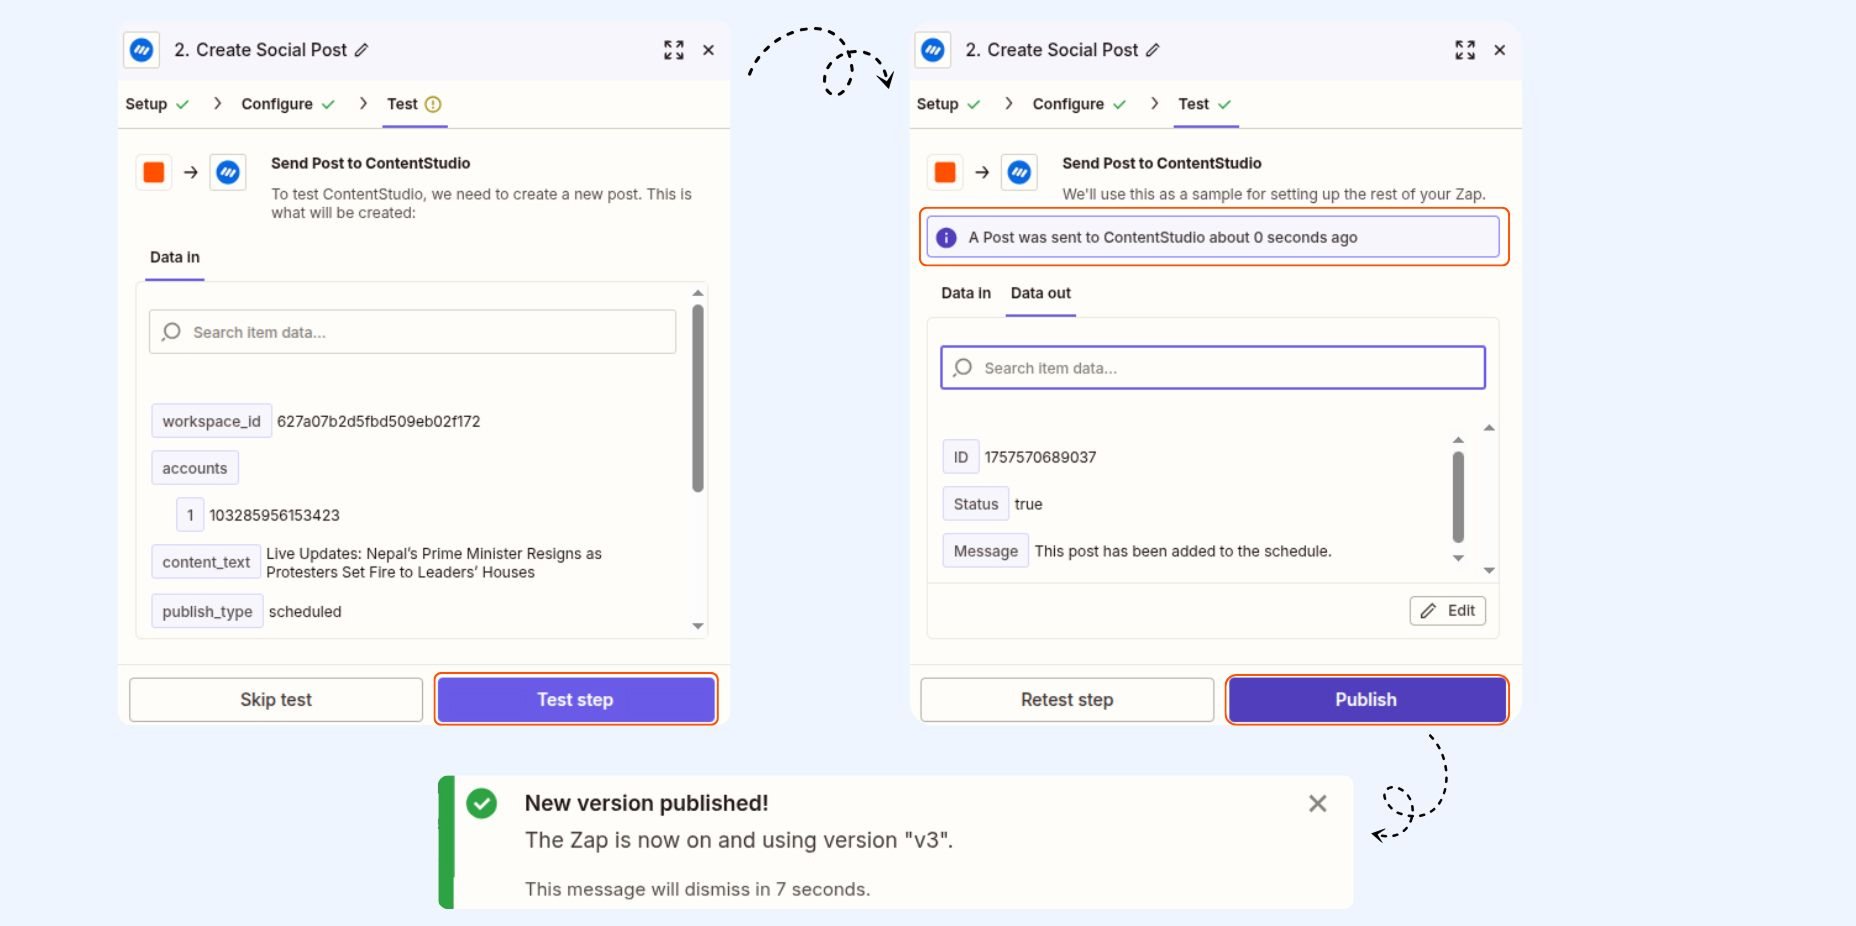
Hit the “Test step” button. Zapier will run through your Zap with real data to make sure everything works. If it does, you’ll see a confirmation that a post was sent to ContentStudio. Check your ContentStudio Publisher to see your new post sitting there, scheduled and ready to go.
If the test works, click Publish. Your Zap is now live and running in the background like a well-oiled machine.
Want to see this in action with a different use case? We put together a video that walks through setting up the integration and shows you another real workflow example you can adapt for your own needs.
Now that you know how to set up the basics, let’s talk about what you can actually do with this thing. These are real automation workflows that actual humans use to save ridiculous amounts of time.
This is the classic. Connect your blog’s RSS feed to ContentStudio, and every time you publish a new post, it automatically gets scheduled across all your social accounts. You can customize the caption for each platform if you want, or just use the post title and excerpt. Either way, you’re no longer manually promoting every single blog post.
Use a service like Feedly or Pocket to collect articles you want to share. Connect it to Zapier, and whenever you save something, it gets queued up in ContentStudio with your commentary. You become the go-to curator in your niche without spending hours each week hunting and posting content.
Just uploaded a new video? Connect YouTube to ContentStudio through Zapier. When a new video goes live, auto-create social posts with the video link, thumbnail, and description across all your platforms. Your subscribers see it on YouTube, while your followers see it everywhere else.
Team member adds a row to your content planning Google Sheet? That row can automatically become a scheduled post in ContentStudio. Great for teams who plan content collaboratively but need one person to handle the actual scheduling.
Got a webinar or product launch coming up? Use a scheduling tool like Google Calendar or Airtable, and whenever an event is created or approaches, automatically trigger a series of promotional posts on ContentStudio. Countdown posts, reminder posts, or last-chance posts; all running on autopilot.
New blog post published? Send it to ChatGPT or another AI tool to generate social-friendly versions with different angles, then automatically post those to ContentStudio, helping you repurpose your long-form content. Or use AI to analyze trending topics in your RSS feeds, generate commentary, and schedule posts about them. You’re basically giving your content strategy a brain that works 24/7.
The beauty of automation workflows is that they adapt to whatever you’re actually doing. Here’s how different types of creators and businesses are using this integration.
If you’re publishing regular content, this integration is basically mandatory at this point. Auto-share new blog posts, YouTube videos, podcast episodes, or newsletter issues. Some creators set up multi-platform strategies where blog posts go to LinkedIn and Twitter immediately but to Instagram a few hours later with different framing.
New product launch? Price drop? Back in stock alert? Connect your inventory system (if it plays nice with Zapier) or use a simple spreadsheet trigger to announce these updates across social media. You can even set up abandoned cart sequences where customers who left items in their cart see retargeting posts.
Managing multiple clients’ social accounts? Use different workspaces in ContentStudio and set up unique Zaps for each client. When Client A’s blog posts, their content goes to their accounts. When Client B’s blog posts, theirs goes to their accounts. No mixing up accounts and no manual switching.
Hosting regular events, workshops, or meetups? Connect your event platform, such as Eventbrite, Meetup, etc., to ContentStudio. New event? Automatic promotional posts. Event starting soon? Automatic reminder posts. Event finished? Automatic thank-you and recap posts with photos.
Breaking news doesn’t wait for your content calendar. Set up RSS feeds for your news categories, and stories get posted to social as soon as they’re published. Some newsrooms use this to automatically share content to different accounts based on article category or tag.
Let’s cut to the chase. Why should you actually care about setting this up instead of just posting manually like you’ve always done?
This isn’t one of those “save 5 minutes a day” things that sounds good in theory but doesn’t move the needle. If you’re managing even 3-4 social accounts and posting daily, you’re easily spending 1-2 hours per week on manual posting. Multiply that by 52 weeks, and you’ve just reclaimed days of your life. Use that time for strategy, content creation, or honestly just taking a break.
The reason most social media strategies fail isn’t because people don’t know what to post. It’s because they forget to actually post it. Automation doesn’t forget. With the ContentStudio Zapier integration, you can make sure your content goes out on schedule whether you’re in a meeting, on vacation, or just having one of those days where you can’t look at your phone. Consistency builds audience, and automation builds consistency.
Posting to LinkedIn, Twitter, Facebook, Instagram, and TikTok manually means doing everything five times. With automation, you do it once (or not at all, if your trigger handles it), and it goes everywhere. You maintain your presence across platforms without the platform-switching fatigue.
When you’re rushing to post the same thing to five accounts, you make mistakes. Wrong account, typo in the caption, forgot to add the link, posted the draft instead of the final version. Automated workflows follow the same pattern every time. If you test it once and it works, it’ll work every time after that.
Want to double your posting frequency? With manual posting, that means double the time commitment. With automation, it means adjusting a few settings. Want to add two more social accounts? Sure, just add them to your Zap. Your system grows without your workload growing with it.
When your content posting is connected to other systems through Zapier, you can get clever with timing and targeting. Post your blog content when engagement is highest based on your analytics. Trigger different posts based on what performed well. Your automation can be as smart as you make it.
Experience organized workflow with a unified social media management platform for agencies.
Try ContentStudio for FREE
You can set up these workflows in five minutes, or you can set them up thoughtfully and actually get results. Here’s what actually works.
Don’t try to automate your entire content strategy on day one. Start with one Zap: your RSS feed to social media. Get that working smoothly. Then add another. Then another. Complex workflows are great, but only after you understand how the simple ones behave.
Just because you’re automating doesn’t mean everything should look identical everywhere. Use Zapier’s formatter tools to adjust your captions. Maybe LinkedIn gets the full context, Twitter gets a shorter version with hashtags, and Instagram gets emoji-heavy copy. Same source content, different presentation.
ContentStudio through Zapier allows 60 requests per minute (3,600 per hour). That’s generous for most use cases, but if you’re running multiple high-frequency Zaps, keep an eye on it. Spread out your posting schedule if you’re hitting limits.
Not every item in your RSS feed needs to become a social post. Maybe you don’t want to share posts tagged as “draft” or “private.” Zapier filters let you add conditions: only create posts if the title contains certain words, or if the category matches something specific. This keeps your feed clean.
Zapier’s test function uses real data from your trigger app. Actually run that test and check how the post looks in ContentStudio. Does the caption format correctly? Are the images loading? Is the timing right? Fix it in testing, not in production.
This should be obvious, but people mess it up. Don’t share your API key in screenshots, GitHub repos, or Slack channels. If it gets compromised, deactivate it immediately and generate a new one. You’ll need to reconnect your Zapier account, but that beats having someone else posting to your social accounts.
Set up notifications in Zapier so you know if a Zap fails. Check your Zap history every couple weeks to make sure everything’s running smoothly. Automation is powerful, but silent failures mean posts never get published, and you don’t realize it until days later.
Things will occasionally break. Here’s how to fix the most common problems you may encounter while exploring the ContentStudio Zapier integration, without spiraling.
Your API key either expired or was deactivated. Generate a new one in ContentStudio settings and reconnect your Zapier account. This takes about 30 seconds.
First, check your Zap history in Zapier to confirm it actually ran. If it did run but you don’t see the post, verify you selected the right workspace and social accounts. Also make sure you’re looking in the right place; for instance, scheduled posts appear in the calendar, not in published posts.
The image URL needs to be publicly accessible. If it’s a file on Dropbox or Google Drive, make sure the sharing settings are set to “anyone with the link.” Better yet, host images on a proper CDN or your website.
Double-check your time format. It needs to be YYYY-MM-DD HH:mm:ss in 24-hour format. Also remember that ContentStudio uses your workspace timezone, so factor that in if you’re scheduling from a different timezone.
If you’re seeing the same content posted multiple times, you probably have multiple Zaps doing similar things, or your trigger is firing more than once. Check your Zap history to see which Zaps are creating posts, and turn off or adjust the duplicates.
The ContentStudio Zapier integration isn’t going to solve all your content problems. You still need good content, you still need strategy, and you still need to actually engage with your audience. But what it will do is remove the tedious, repetitive posting work that eats up your time and mental energy.
Here’s what you’ve learned: connecting ContentStudio to Zapier lets you build automation workflows that create and schedule social posts automatically based on triggers from thousands of other apps. You can auto-post blog content, curate articles, promote events, announce products, and maintain a consistent social presence without being glued to your screen.
The setup takes maybe 10 minutes the first time you do it. The time savings compound every single week after that. If you’re serious about maintaining a social media presence without it taking over your life, this integration is one of those rare tools that actually delivers on its promise.
Start with one simple Zap today. RSS feed to social posts, or new YouTube video to social promotion. Get that working. Then build from there. A year from now, you’ll look back and wonder how you ever did this manually.
You can generate it from ContentStudio settings. Full steps are explained in the ContentStudio API guide.
Yes, but each account will need its own API key and separate connection.
You’ll need to generate a new API key in ContentStudio and reconnect it to Zapier.
The ContentStudio Zapier integration supports the following main actions:
Plan 0 Days of Content in 0 Minutes
Create, schedule, publish and analyze your content across all your social media channels from one simple dashboard.
4.7 on Capterra • 16,500+ marketers trust ContentStudio

Maryam Haq is a Product Marketing Writer at ContentStudio who leads coverage of product launches and feature announcements, from AI Video Generation to integrations like Pabbly Connect and the ContentStudio MCP server. She also writes on brand awareness, reputation management, and campaigns, and reviews product content for accuracy and consistency.
View all posts by Maryam HaqRecommended for you
15 best social media management tools to plan, schedule, and grow in 2026

Influencer marketing: Types, strategy, and how to run campaigns that actually work

Twitter marketing strategy: A complete guide for marketers in 2026

Best social listening tools in 2026 for agencies and brands

