How to build an executive’s LinkedIn content workflow with Claude Code
Oct 1, 202615 minutes

Written by
Saif AliUpdated
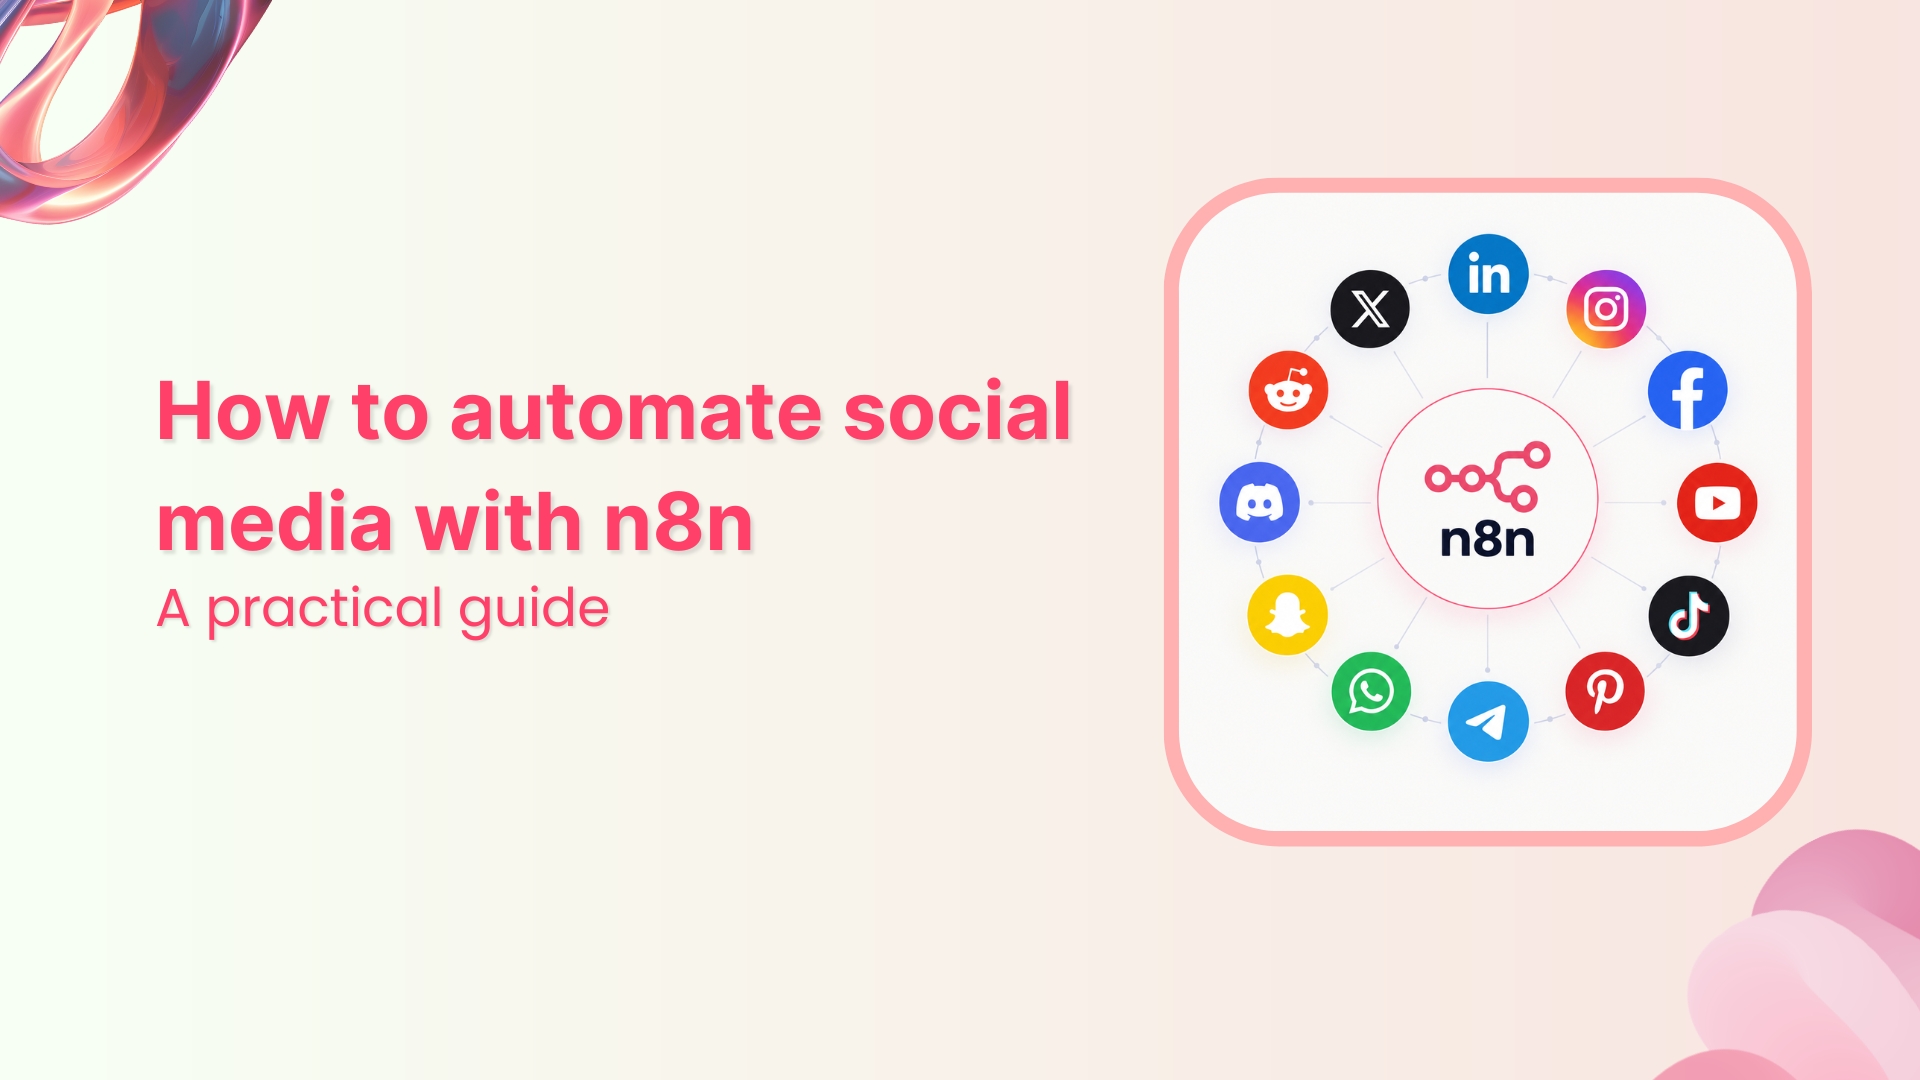
Most n8n social media tutorials stop at the easy part: a trigger fires and a single post goes out. The hard part shows up later, when you connect your third platform and realize each one has its own login flow, its own media rules, and its own way of breaking when a token expires.
This guide covers how to automate social media with n8n. You’ll learn what n8n can actually do for social posting, the two ways to connect it to platforms and why the choice matters, and a complete setup you can replicate using ContentStudio’s n8n integration as the working example.
n8n is an open-source workflow automation tool. You build workflows on a visual canvas by connecting nodes: a trigger starts the flow, and each node after it does one job, fetch data, transform it, or send it somewhere. It handles scheduling, branching, looping, and error handling on its own, so you can build logic that would otherwise need a backend.
For social media, that means wiring up a chain like: new blog post published → format it into a caption → create the post across your accounts → log it in a sheet. Once it’s built, it runs without you. No copy-paste, no manual scheduling, no forgetting to post.
The one decision that shapes everything else is how n8n connects to the platforms themselves. Get that right, and the rest is easy. Get it wrong, and you’ll spend more time fixing the automation than you saved building it. This is also where AI in social media management can fit into the workflow, helping with tasks like content creation and optimization.
There are exactly two approaches, and the difference is the whole game.
You add an HTTP Request node (or a community node) for every network and talk to each platform’s own API — the X API, the LinkedIn API, the Instagram Graph API, and so on. This gives you raw access to everything each platform offers. It also hands you everything each platform demands:
For one or two platforms, this is fine. For a full posting workflow across six or eight networks, you’re now maintaining eight small integrations that each fail differently. The build takes an afternoon; the upkeep never ends.
Instead of talking to each network, you talk to one publishing API that talks to the networks for you. In n8n, that collapses eight HTTP Request nodes into one. You send a single request with content, media, target accounts, and a schedule, and the service handles platform-specific formatting, authentication, and delivery.
You trade a little raw control for far less maintenance: one credential instead of eight, one media format instead of a matrix of them. When a platform changes its API, the service absorbs it, and your workflow never notices. This is the approach the rest of the guide uses, with ContentStudio as the example. It’s one of a wider set of ContentStudio integrations you can drive from a workflow.
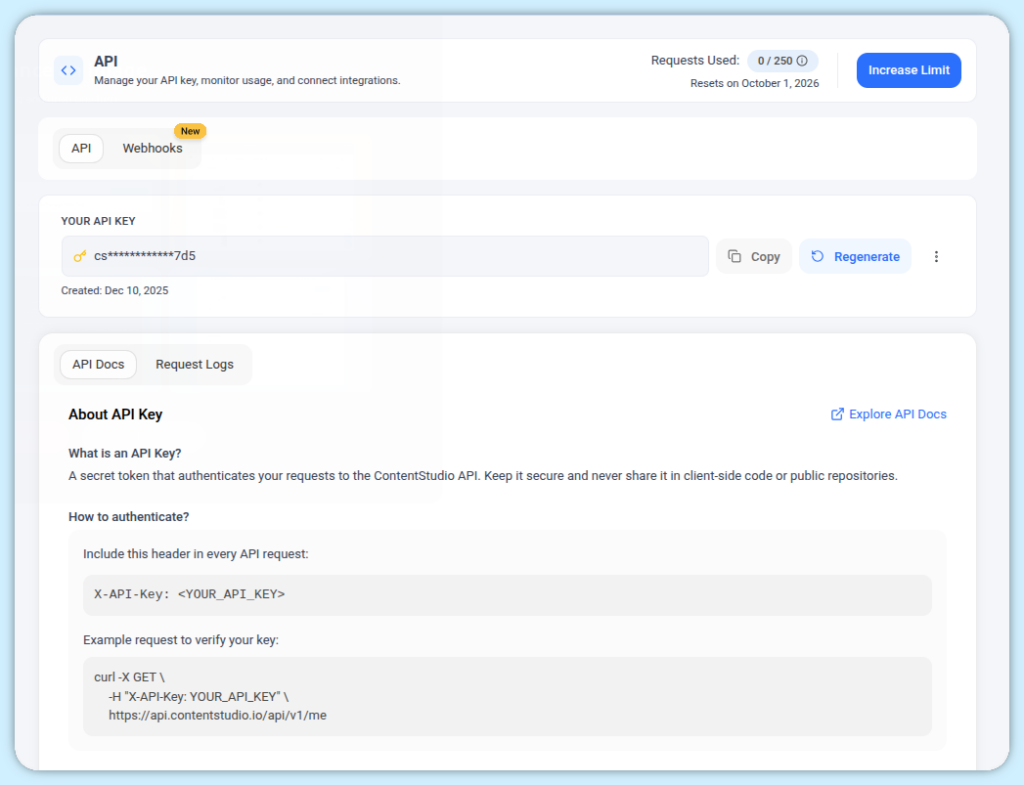
n8n connects to ContentStudio through its API using HTTP Request nodes; there’s no dedicated node to install. You authenticate with an API key sent in the X-API-Key header, and every action is a standard HTTP call.
Here are the endpoints you’ll use:
| Action | Method | Endpoint |
| Fetch workspace | GET | /workspaces |
| Fetch social accounts | GET | /social-accounts |
| Create post | POST | /posts |
| List posts | GET | /posts |
| Delete post | DELETE | /posts/{id} |
| Get authenticated user info | GET | /me |
The post body is JSON carrying four fields:
| Field | Description | Example |
| content | Main text or caption of the post | “New blog post is live!” |
| media | Image or video URLs (optional) | [“https://img.url/1.jpg”] |
| accounts | Account IDs to publish the post | [12345, 67890] |
| scheduling | Timing for the post (draft, now, or future) | “2026-09-20T10:00:00Z” |
For the full endpoint documentation, see the ContentStudio + n8n setup guide.
Four steps take you from an empty canvas to a live post: get your key, add a trigger, add the HTTP Request nodes, then test and deploy.
In ContentStudio, open Menu → API Key from your profile menu and generate a key. This authenticates every request sent in the X-API-Key header. Keep it private; treat it like a password, because it works like one.
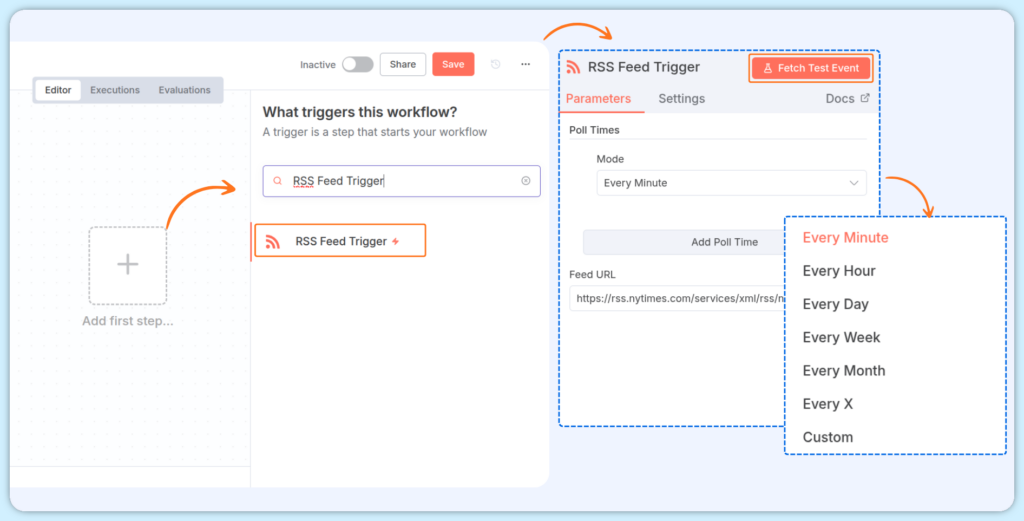
Create a new workflow in n8n and add a trigger that fits your use case. The trigger is the event that starts the workflow. Common choices:
For an RSS trigger, enter the Feed URL, choose the Mode (every minute, hour, day, and so on), then click Fetch Test Event to confirm data is coming in.
Before it can post, your workflow needs to know where to post. Add a new step and choose HTTP Request, then point it at GET /workspaces.
The fastest way to fill this in: import the cURL snippet from the ContentStudio API Guide, which auto-fills the fields. Otherwise, enter the endpoint URL and fill the fields manually. Add your API key in the X-API-Key header and click Execute Step to pull your workspace details.
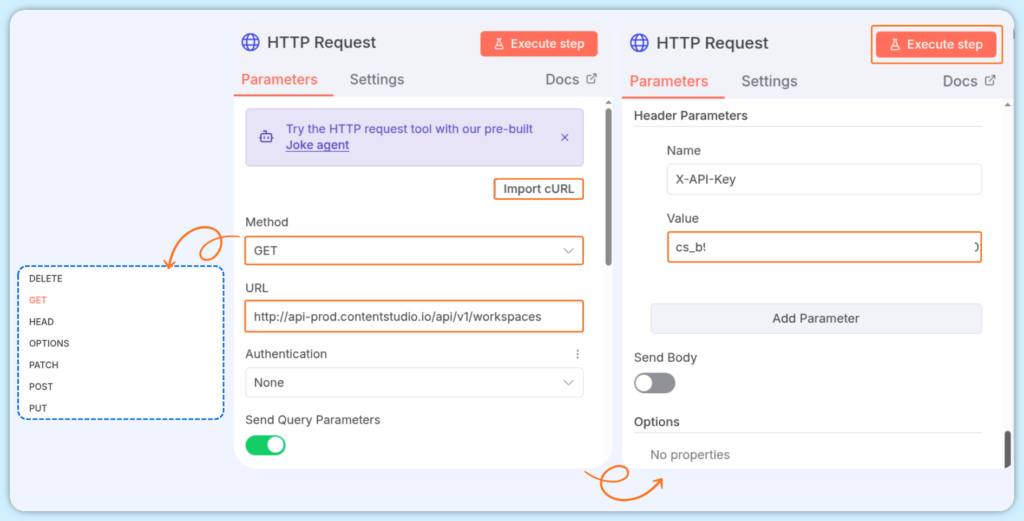
⚠️ If you manage multiple workspaces, confirm you’re using the right one. Posts sent to the wrong workspace won’t appear where you expect them.
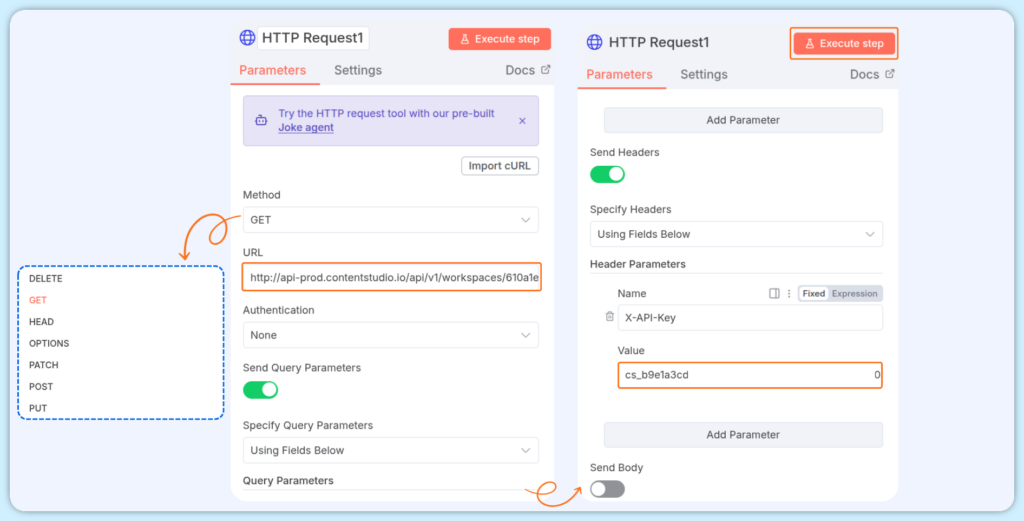
Add another HTTP Request step pointing at GET /social-accounts. Import the cURL from the API Guide or fill the fields manually, add your API key, and click Execute Step to pull every connected account. This returns the account IDs you’ll target when you create the post.
Add one more HTTP Request step, this time POST /posts. Import the cURL from the API Guide under Posts → Create a new social media post, or fill the fields manually. Add your API key and configure the JSON body using the four fields from the reference above.
Map the caption and media from your trigger data into the body in the n8n node you referenced earlier, node output with expressions. A finished body looks roughly like this:
{
  "content": {
    "text": "{{ $('RSS Feed Trigger').item.json.content }}",
    "media": {
      "images": [],
      "video": ""
    }
  },
  "accounts": [
    "{{ $json.data[0].id }}"
  ],
  "scheduling": {
    "publish_type": "draft",
    "scheduled_at": "2026-09-20T10:00:00Z"
  }
}
Click Execute Step to send the post to ContentStudio.
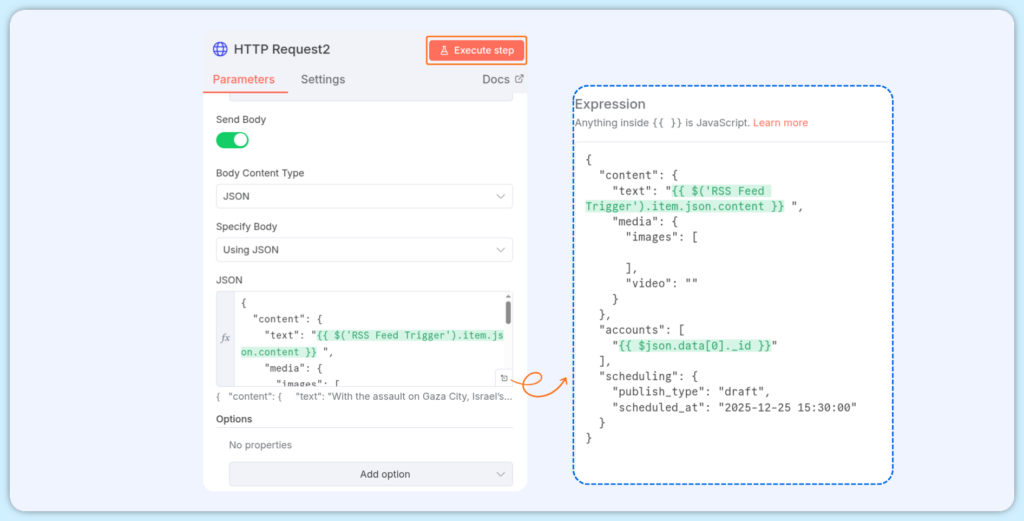
One media note: multiple images are supported per post, but only one video.
Run the whole workflow with Execute Workflow and confirm the post reaches ContentStudio. If a request fails, the JSON body is almost always the cause, a single missing comma or quote breaks it. Once it works, activate the workflow so it runs on every trigger. Your post lands in the ContentStudio Planner, where you can review and manage it.
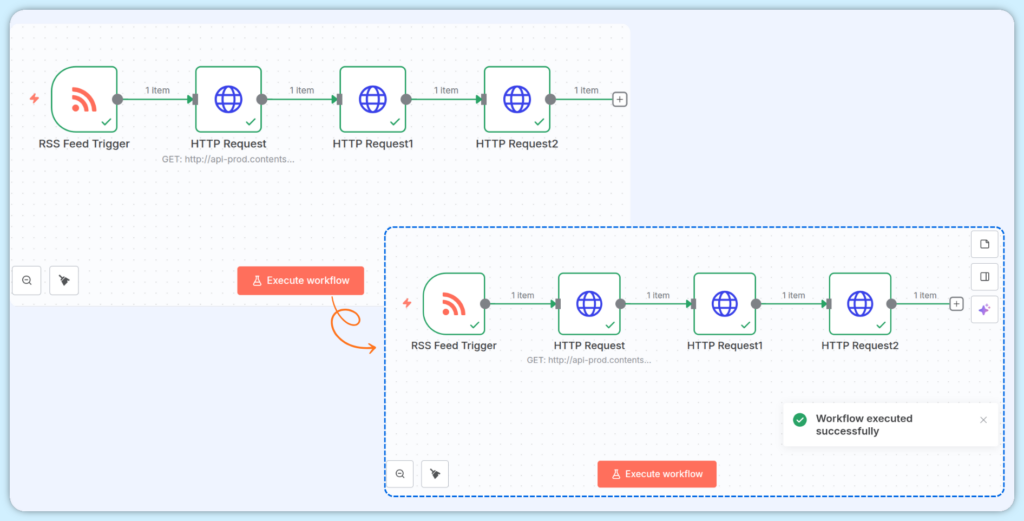
Prefer to watch it built? This walkthrough starts from an empty canvas, wires up the RSS trigger and the HTTP Request nodes, and runs a live post to ContentStudio end to end.
n8n tutorial for beginners: building the ContentStudio workflow from scratch.
Once the basic loop works, the same structure, a trigger plus the posts endpoint, powers a lot of useful automations.
Your CMS publishes an article and fires a webhook into n8n. The workflow shapes the article into a post and pushes it across your accounts. Every new article promotes itself the moment it goes live.
A Google Sheets node detects a newly added row. n8n maps the caption, image URL, and schedule cells into the JSON body and creates the post. Anyone on the team can queue content by editing a spreadsheet, with no n8n access required.
An RSS trigger passes a new article to an AI node (OpenAI, Claude, or similar). The AI writes a platform-specific caption, and the next HTTP Request node sends it straight to ContentStudio. You get on-brand copy without writing each post by hand.
A review platform fires a webhook when a new review comes in. n8n builds a testimonial post with attribution and schedules it. Positive reviews turn into social posts automatically.
If you’d rather not build from scratch, start from a ready-made ContentStudio n8n template and adapt it to your data.
Because you build every request yourself, you control exactly what leaves your workflow and when. A few habits keep it safe:
When a workflow breaks, the cause is almost always the credential, the JSON body, or the workspace you pointed the request at. Start there.
Your API key is wrong or expired. Regenerate it in ContentStudio settings, update the X-API-Key header in your HTTP Request nodes, and run the step again.
Check that the posts node returned a success response. If it did, the request likely hit the wrong workspace verify the workspace ID and account IDs in your JSON body.
The trigger data may not match the format the endpoint expects. Add a step to reshape it into the JSON structure the posts endpoint needs before the request runs.
Use the exact datetime format the API expects and confirm the timezone matches in both ContentStudio and n8n. Also verify the accounts you’re posting to still exist and are connected.
You can automate social media with n8n two ways: wire up each platform’s API yourself and maintain a stack of fragile connections, or route everything through one API and build once. The single-API path is faster to set up and far less to maintain.
If that’s the route you want, connect ContentStudio to n8n and start with a trigger and one HTTP Request node. Grab a template to skip the setup, or follow the full guide.
Yes. n8n can create and schedule posts automatically using a trigger (like an RSS feed or Google Sheet) connected to a social platform’s API through HTTP Request nodes. Once built, the workflow runs on its own.
n8n is open-source and free to self-host. It also offers paid cloud plans if you don’t want to manage hosting yourself. Either way works for social media workflows.
No. You build workflows visually and configure HTTP Request nodes with JSON. It’s more technical than a one-click connector, but it isn’t programming, and cURL imports fill most fields for you.
Send one request to a publishing API that handles every network, instead of building a separate node per platform. With ContentStudio, one POST /posts call publishes to all your connected accounts at once.
Yes. In the post’s JSON body, the scheduling field lets you save a draft, publish immediately, or set a future date and time.
It’s almost always one of three things: an expired API key, a malformed JSON body (a missing comma or quote), or the wrong workspace. Check those in that order.
Plan 0 Days of Content in 0 Minutes
Create, schedule, publish and analyze your content across all your social media channels from one simple dashboard.
4.7 on Capterra • 16,500+ marketers trust ContentStudio
Saif Ali is a Content Marketing Strategist at ContentStudio with over five years of experience across SaaS, IT, and digital marketing. He specializes in SEO-led content, AI content creation, and social media strategy, and leads editorial review at ContentStudio, fact-checking and refining articles for accuracy, SEO, and a consistent brand voice.
View all posts by Saif AliRecommended for you
How to build an executive’s LinkedIn content workflow with Claude Code
How to turn one product photo into 5 video Ads with Claude Code
Social media MCP server: How to automate posting with ContentStudio
How to turn a product image into a full campaign with Claude Code